Windows VPS Login: Beginner’s Quick Guide for Seamless Access

Want to access your Windows VPS via RDP?
Before we jump into accessing your Windows VPS via RDP, let’s understand what RDP is.
Jump To...
How does RDP work?
RDP stand for Remote Desktop Protocol, a cornerstone in the arsenal of Microsoft Windows, emerges as a pivotal instrument, transforming the landscape of remote desktop connectivity. Ingrained in every iteration of Windows, RDP serves as the portal to remote access, empowering users to seamlessly connect to their computers from a distance and conduct tasks effortlessly over the internet.

3 Simple Steps to Easily Connect to a Windows VPS via RDP
Connecting to your Windows VPS through Remote Desktop Protocol (RDP) is actually easier than you might imagine.

Simply follow these straightforward steps to experience seamless access to your virtual workspace:
Step 1: Open the Remote Desktop Connection application.
In Windows 10, accessing the Remote Desktop Connection software is effortless. Here are three straightforward methods to open it:
Method 1: Navigate to the Start Menu, click on “All programs,” then “Accessories,” and finally, find the Remote Desktop Connection icon. Double-click to open it.
Method 2: Press the Windows key + R to bring up the “Run” dialog box, type “mstsc,” and press Enter.
Method 3: Use the search box in the taskbar to find “Remote Desktop.” Click on the application when it appears in the search results.

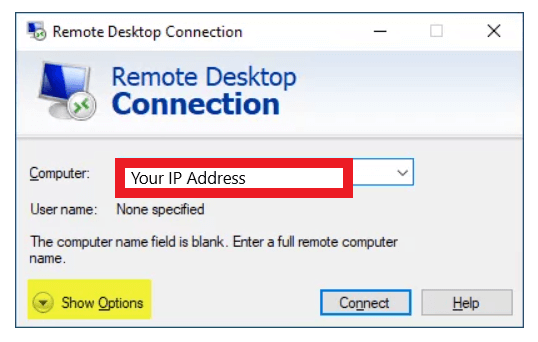
Step 2: Input the IP address of your VPS.
Once the Remote Desktop Connection window is open, locate the field labeled “Computer.“
Enter the IP address of the dedicated server hosting your Windows VPS into this field. This specific numerical address enables your local device to locate and establish a connection with your VPS over the internet.
Step 3: Input your username and password.
After entering the VPS server IP address, click on the “Connect” button. You’ll then be prompted to enter your VPS username and password. Input the correct credentials, and then press “OK” to proceed.

Pro Tip: Save time by utilizing the "Remember Me" option
For future connections, you can opt to check the “Remember me” box. This saves your username and password, making the login process smoother for subsequent sessions.
End the RDP session
When you’re done working on the VPS, securely terminate the RDP session, especially on public or non-secure devices.
Follow these steps to do so:
Click on the Start Menu button on the VPS desktop.
Locate the icon that resembles a person and represents the user account. Click on it.
Choose “Sign out” to close the RDP session safely.

Connect to a Windows VPS or RDP server using a Linux operating system.
If you’re utilizing a Linux operating system and wish to access a complete Windows desktop or VPS via the Remote Desktop Protocol (RDP), don’t worry!
Simply follow these steps to connect seamlessly using Remmina, a robust remote desktop client for Linux:
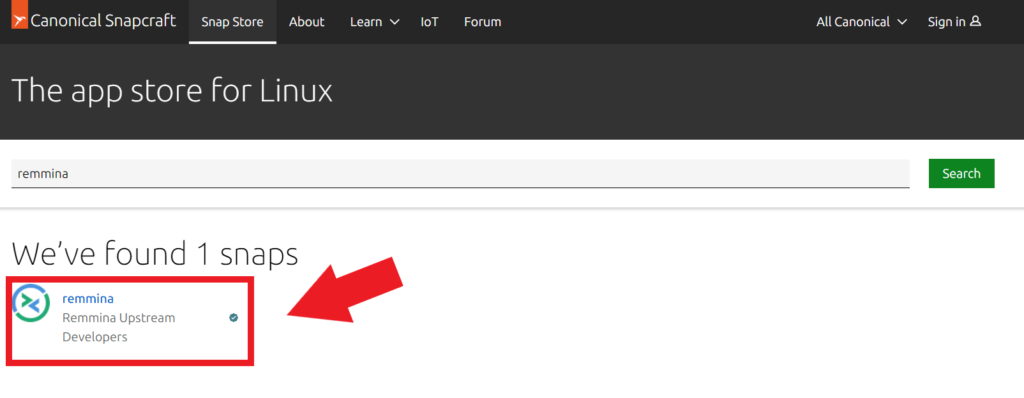
Step 1: Download and Install Remmina
Initially, you’ll need to install Remmina, the remote desktop client, from the Snap Store.
Here’s how:
Access your Linux OS and click on the “Show Applications” button positioned at the bottom-left corner of your screen.
Show Applications icon
Look for “Remmina” in the application list, then click on its icon to open the remote desktop client.
Step 2: Add a New Connection Profile
Once Remmina is launched, you can start by creating a new connection profile to link up with your Windows VPS:
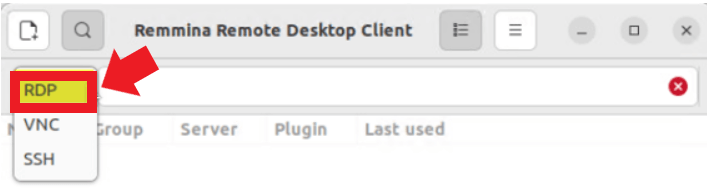
Select the plus sign (+) icon within Remmina to begin setting up a new connection profile.
In the new window, choose “RDP” as the connection type.
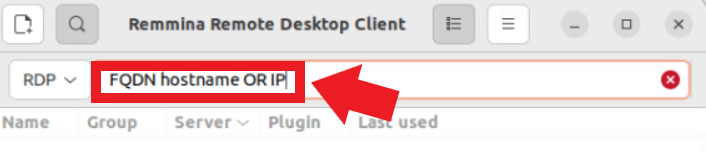
Step 3: Enter the VPS hostname or IP address.
Now, you’ll need to input the required details to establish a connection to your Windows VPS:
In the “Server” field, input the VPS hostname or IP address of the server you wish to access.
Press the Enter key to continue.
Step 4: Authenticate using your VPS credentials.
After pressing Enter, you’ll be asked to input the username and password for your VPS, information that should have been provided in the welcome email:
- Enter the provided VPS username and password into the authentication window.
- Click “OK” to continue.

Step 5: Dealing with Certificate Warnings
Since this could be your initial login, you might encounter a certificate warning:
- If a certificate warning appears, click “Yes” to proceed. This warning is typical and occurs during the initial connection.
- Remmina will save the certificate data for future connections, ensuring subsequent logins are smoother.

How do I login to a Windows VPS from macOS?
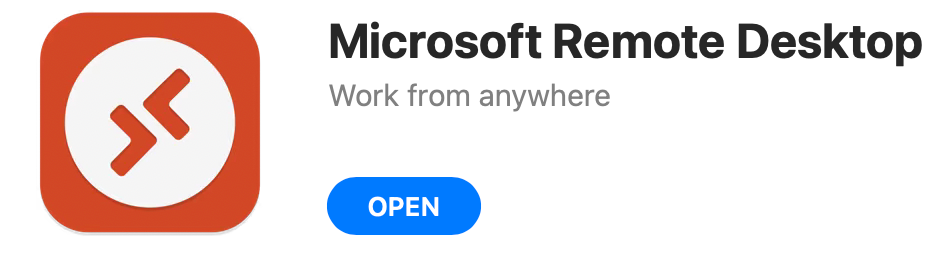
Are you using macOS and seeking to access your Windows VPS? Learn how to achieve this effortlessly by utilizing the Microsoft Remote Desktop (MRD) application, conveniently accessible via the App Store. Simply follow these steps to connect to your Windows VPS from your Mac:
- Download and install the Microsoft Remote Desktop (MRD) application:
Head to the App Store on your Mac, search for “Microsoft Remote Desktop,” and proceed to install the application.
Open Microsoft Remote Desktop:
After installation, launch the MRD application on your Mac.

Initiate a new Remote Desktop connection:
In the next window, click on the “+” (plus) icon positioned at the top-left corner of the MRD window, then choose “Desktop” to establish or set up a new remote desktop connection.
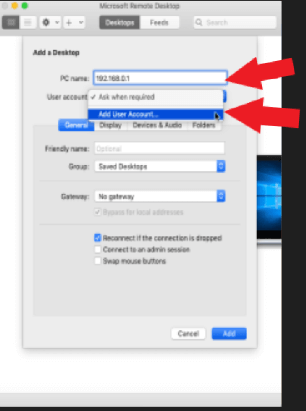
Input the PC name or server IP address:
In the new connection window, input the PC name or the server IP address of your Windows VPS’s remote server.
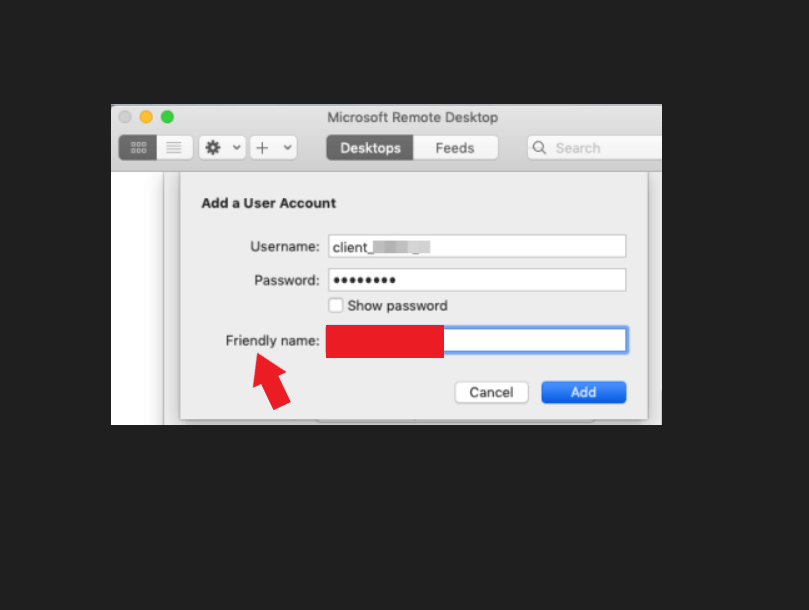
Add User Account:
Click on “Add User Account” from the user account drop-down menu. Enter your VPS username and the administrator password (provided via email). Set the username as “Administrator” or any other identifier for simplicity.
6. Save and finalize the connection:
Leave the other settings as default and click “Add.” Your new remote connection will now be visible in MRD.
Initiate the connection:
Click on the “Start” button to begin the connection to your Windows system and VPS. MRD will automatically configure your Windows system’s Start menu and your Mac OS remote desktop for the VPS.
Access Your Windows VPS:
Now, you can log in to your Windows VPS anytime by opening the MRD application. Just choose the remote connection you created to access your Windows VPS.
Windows RDP Client Alternatives
In addition to using Microsoft Remote Desktop for remote connections, you have the option to connect to your Windows VPS from macOS using alternative RDP clients, including:
PuTTY:
PuTTY is a free software application for Windows OS that can be utilized to establish a secure shell (SSH) connection from the remote server to your local system, VPS, or dedicated server hosting it.

2X RDP Client:
An additional method for connecting remotely to your Windows desktop or VPS from macOS.
By following these simple steps and exploring various RDP client choices, you can effortlessly access and manage your Windows server or VPS, even from your macOS device.
Frequently Asked Questions
A VPS, or Virtual Private Server, is essentially a server within a server. It operates within a physical server and offers a flexible and cost-effective hosting solution. Acting as a middle ground, it provides more control, resources, and customization options than shared hosting servers, yet remains more affordable than a dedicated server.
You can easily link to and oversee your own VPS hosting or servers via a Secure Shell (SSH) from any computer operating system. SSH enables you to create a secure and encrypted link between your local machine and the VPS, providing remote access and complete control over the server. Through SSH, you can execute commands, sign in, transfer files, and carry out diverse administrative duties on your VPS, ensuring a smooth hosting experience.
Secure Shell (SSH) serves as a network communication protocol facilitating secure communication and data exchange between two computers across an open network.
It incorporates both public key authentication and robust password authentication, guaranteeing secure and encrypted communication between the two operating systems.
To utilize SSH for VPS login, make sure you have the following:
The remote computer (VPS) is powered on and connected to the local network.
The IP address of the distant device you intend to establish a connection with.
Permission to access the virtual private server (VPS) remotely.
SSH privileges authorized for your Virtual Private Server (VPS) account.
Firewall configurations permitting external SSH connections.
Your IP address included in the firewall’s list of permitted addresses.
SSH login credentials retrieved from the VPS dashboard (SSH username and password).
For individuals using Windows, an SSH application or server featuring OpenSSH installed and activated.
Meeting these criteria guarantees a secure and effective SSH login to your VPS hosting, facilitating seamless management and interaction with your server.
Initially, an RDP server supports a maximum of two connections per RDP server. Nevertheless, by acquiring a Windows Server 2019 Remote Desktop Services (RDS) license, you have the capability to extend the number of user connections to up to 10 on your Windows Server 2019. This allows multiple users to access and utilize the server concurrently.