Comprehensive Manual on Leveraging the PS AUX Command in Linux

Numerous commands in Linux are tailored for executing processes within various Linux distributions. Among these, the ‘ps’ command proves particularly useful and versatile when utilized in the terminal. Below, we’ll walk you through the application of the ‘ps aux’ command and delve into the options it offers.
In addition to a comprehensive guide on ‘ps aux,’ we’ll provide insights into the broader ‘ps’ command in Linux and the variables it encompasses. Our coverage spans from the fundamental steps of invoking the ‘ps’ command, understanding its accepted parameters, to exploring how ‘ps aux’ is integrated into the display within the Linux ‘ps’ command.
Jump To...
What is the Linux Process Status Command Utility?
The ps (Process Status) command is a utility in Linux that provides information about processes within a system. It offers a perspective on various aspects of processes, making it useful for tasks such as viewing or managing specific process IDs in Linux, along with essential information related to the respective processes.
The fundamental structure of the ps command statement is:
$ ps <OPTIONS>
The effectiveness of the “ps” command is contingent upon the array of options it supports, and we’ll delve into these options in greater detail later on.
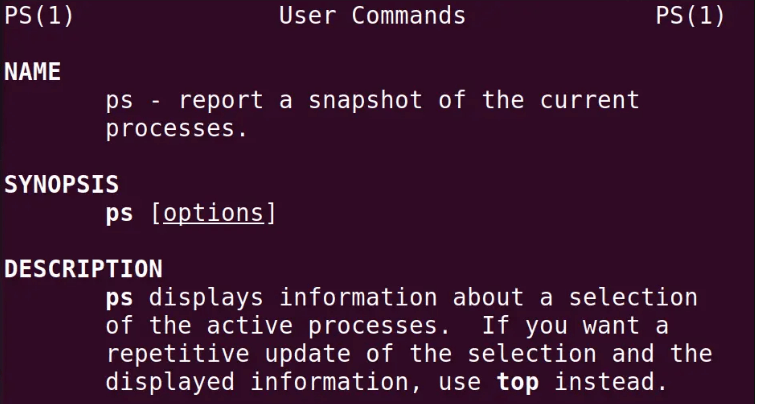
Process Status Command Manual
To access a more extensive list of options and gain a deeper understanding of the “ps” command, you can refer to the manual by inserting the following statement:
$ man ps
Upon correctly entering the command, you should observe output similar to the following example:
While numerous guides on the ps command are available, you now possess a foundational understanding of its basics. Armed with this knowledge, let’s explore the fundamentals of the ps aux command, what it refers to, and how to effectively apply its functionalities.
How do PS Columns Different from ps aux Columns?
Before delving into the ps aux command, it’s crucial to recognize that ps and ps aux are distinct commands. To utilize ps aux effectively, it’s imperative to comprehend the information provided by the basic Linux ps command and understand the columns relevant to ps aux.
When we invoke the straightforward ps command, which is done by entering it like this:
$ ps
Upon executing the simple ps command, the output will include the following columns:
- PID: Represents the process ID of the specific running processes.
- TTY: Indicates the terminal screen associated with the running processes.
- TIME: Displays the time the process has consumed in CPU usage during its execution.
- CMD: Presents the full command from which the process has spawned.
These columns provide essential information about the running processes when utilizing the basic ps command.
What Information Do the Columns in ps aux Contain?
To reveal the “AUX” in the command and understand its corresponding columns, we will be discussing the following:
- A: The option that displays the users who are running the process.
- U: Provides additional information about the process.
- X: Indicates that the process is not associated with any running terminal screen.
Each of these aspects will be evident when you execute the standard default output ps aux command, which is:
$ ps aux
Upon execution, the ps aux command will furnish information for every section, incorporating the session leader’s a, u, and x features. The overall output will resemble something similar to the image provided.
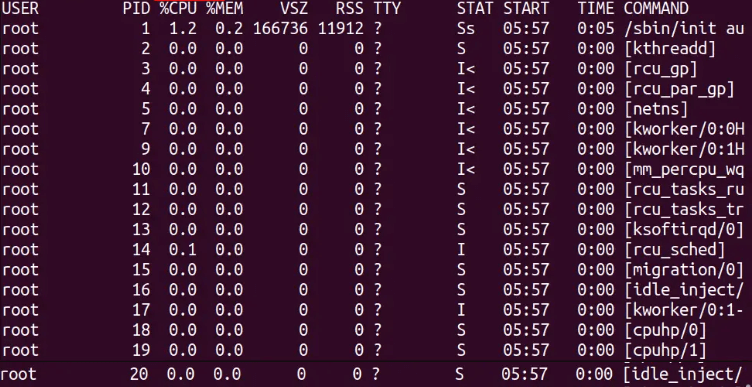
As evident, the ps aux command employs a comprehensive set of columns when used for a full-format listing.
Utilizing the ps aux Command in Linux
If you’re seeking guidance on utilizing the ps aux command in Linux with specific features, not just the entire terminal with session leader, we’ll delve into each option, including “a,” “u,” and “x,” and elucidate what each provides in the context of individual processes. These distinct utilities can enhance your efficiency and contribute to the seamless operation of your tasks.
How to Utilize the "A" Flag in the ps aux Command
To observe the output of the “a” option when incorporated into the command, properly insert the following:
$ ps a
Once this is done, you will observe the PID (Process IDs) along with the STAT column, displaying the state codes of the running processes. For instance, the “S” process signifies the sleep process, while the “R” indicates the running process.
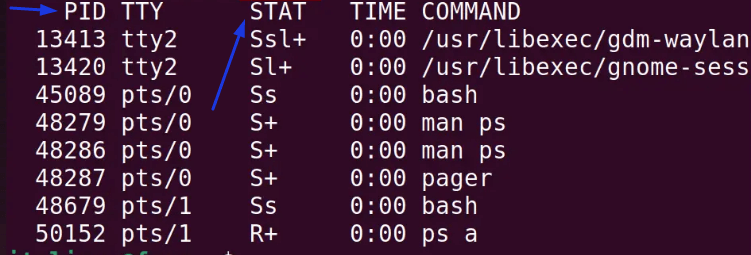
As previously mentioned, the “A” option in the ps aux command displays the process IDs and the state of the session id for each real user.
How to utilize the "U" output format in the ps command
The “u” output provides the default display width and virtual memory format with additional valuable features, offering comprehensive user-defined output format control settings. To display this command, simply input:
$ ps u
In this output, the following columns are provided:
- USER: Displays the user utilizing the process. This can also be a UID (User ID) number.
- %CPU: Represents the percentage of CPU usage by the process.
- %MEM: Indicates the percentage of the process’s resident set size to the physical memory on the machine (non-swapped physical memory).
- VSZ: Denotes the size of the physical memory or virtual file occupied by the process.
- RSS: Specifies the size of the physical memory used by the process.
- START: Displays the initiation timestamp of the process.
- COMMAND: Represents the command that initiated the process.
If you aim to view processes specific to certain users connected to their accounts, use the following command:
$ ps –U [Username]
This code reveals each user’s file access permissions for processes identified by their real or effective user ID. It proves useful for individuals seeking insights into a specific user’s impact on the executable file of a process. It also facilitates the selection of processes based on the real user ID or name (RUID). The Real User ID provides the user’s name, whereas the Effective User ID (EUID) describes the user whose file access permissions are utilized by the running process.
How to employ the "X" output format in the ps command
Executing the “x” command is straightforward, and it should be implemented as per the provided example:
$ ps x
Upon correctly executing the command, you should observe the following columns:
PID.
TTY.
STAT
TIME.
COMMAND.
It’s important to note that the operational output of “x” mirrors that of “u” with the sole distinction that “x” displays processes running without an association to any terminal screen. The primary difference lies in the inclusion of only the executable name.
What is the Purpose of PS on Linux?
Utilizing ps commands in Linux facilitates the monitoring of the status of running processes, providing technical details about them. This proves beneficial for administrative tasks and enables the definition of each process’s priorities through virtual files.
In addition to the ps aux command, the basic ps command offers various options that can be combined to gather information about the running system processes. A comprehensive understanding of these additional options, along with the ps aux options, is crucial. Below, we will delve into some of these options in more detail, addressing specific scenarios.
What are the Options for the PS Command?
Options for the PS Command
The ps command supports three primary options:
UNIX Style Options: UNIX style involves grouped options typically using a “-“, such as “-aux”.
BSD Options: BSD options do not require grouped characters, for instance, “help” or “aux”.
GNU Options: GNU options always start with a double dash “–“, for example, “–deselect”.
Several ps commands related to the process ID might include:
-a
Displays all running processes in different formats.
-m
Displays the PID, time of initialization, terminal screen, and command that is being executed.
-t
Displaying the process of the current terminal.
-o
Displaying the output of the process.
-l
List down the processes.
-s
To view basic processes, use the following command:
For more comprehensive options, execute the command below:
$ ps --help list
This will provide you with a more detailed list of other valuable commands to inspect the process status within the Linux system.
UNIX Syntax for the Linux PS Command
It’s essential to be familiar with some fundamental UNIX-style commands in the Linux system when working with the ps command. Keep in mind that the UNIX operating system is case-sensitive, and this aspect should be taken into consideration when entering the output modifiers.
Displaying a Directory
To showcase a directory on UNIX, utilize the following command:
ls
“ls” enumerates the names of files in a specified UNIX directory. This command exhibits the pertinent files in your current working directory in alphabetical order without any qualifiers or parameters. Additional modifiers that can be included within the “ls” command include:
ls -l
The command prompt “ls -l” presents a “long listing” of the files in your directory. It not only reveals the file names but also provides detailed information such as protection settings, associated process, file owner, file size in characters, and additional modifiers.
ls -a
This includes listing all your files, even those starting with a period, such as hidden files.
For more information, you can access the manual of “ls” with the following UNIX system prompt:
man ls
Duplicating Files
To duplicate your files, initiate by typing the following:
cp
This can be conveniently employed to duplicate files in your default directory, transfer files from one directory to another, or copy files from other devices. Additional modifiers you can utilize include:
cp fileone filetwo
This command duplicates the contents of “fileone” to a file named “filetwo”. Upon completion, two files will exist.
cp /usr/neighbor/testfile .
This command is used to copy the “test” file from the directory “/user/neighbor” into your UNIX account. The “.” appended at the end signifies that the file is to be copied into your current working directory.
cp ~username/file1 yourfile
This command copies “file1” from the user’s directory into your UNIX account, and the file will be named “yourfile”.
Removing and Renaming Files
If you wish to delete specific files using UNIX, proceed with the command:
rm
With this command, you can also include multiple files to be deleted by adding a space between each specification. An example is provided below:
rm newfile oldfile
If you intend to rename your files, proceed with the following command:
mv
“mv” facilitates the alteration of file identification or name. For instance, renaming “oldfile” to “newfile” can be accomplished as demonstrated below, resulting in only one file existing after the name change:
mv oldfile newfile
If you wish to create a new name and redirect it to the bin or directory, follow through with this command:
mv oldfile bin/newfile
This will ensure that only one file remains in existence.
What does "ps" command do for a specific PID? Listing Processes with a Specific PID
If you want to observe the process from the perspective of the PID, execute the following ps command:
ps -fp PID
For instance, if your PID is “1234,” the command format should resemble the following:
ps -fp 1234
The output display will resemble something similar to this example:
Where is the PID located in the "ps aux" command output?
When reviewing the display, the PID (Process ID) is one of the primary options provided in the ps aux command. Here is a straightforward representation of where it should be displayed in the output format:
USER PID %CPU %MEM VSZ RSS TTY STAT START TIME COMMAND

root 1 0.0 0.2 169820 14028 ? Ss Nov01 0:52

root 2 0.0 0.0 0 0 ? S Nov01 0:00

root 3 0.0 0.0 0 0 ? I< Nov01 0:00

root 4 0.0 0.0 0 0 ? I< Nov01 0:00
As illustrated, the PID is situated in proximity to the USER-defined format specifiers in the display.
What does PPID signify in the ps command?
PPID (Parent Process ID) is indicative of the parent process in a process hierarchy, essentially representing the primary process of all the processes inspected within the process hierarchy of the ID. The smaller processes within this hierarchy are regarded as child processes, each possessing its own Process ID.
What is the Linux command to discover the parent process ID?
If a parent process forks your process, understanding the parent-child relationship becomes essential, particularly in scenarios involving a dead child process.
To view all forked processes from the parent, such as those belonging to Apache, execute the following command in bash:
ps -o pid,uname,comm -C bash
The initial process, owned by the root, represents the main function of Apache, while the subsequent ones are forked processes from the parent Process ID. To display all child processes, proceed with the following command:
ps --ppid PID no.
If, for instance, you had a full user ID with PID number “1234,” you would substitute the user ID into the example as follows:
ps --ppid 1234
What does "ps ax" signify?
As mentioned earlier, the STAT column depicts the current status of the process based on the USER. The two most common entries are either S for sleeping or R for running. Sleeping (S) indicates that the process is not active or running, while Running (R) signifies that it is actively utilizing the CPU.
A few other entries you might encounter in the STAT display are:
- D: Uninterruptible sleep (typically IO), which is in a blocked state.
- T: Stopped by either a job control signal or it has been traced. Another process ID can restart it.
- X: Dead processes will display an X (although this should never be seen).
- Z: Also called Zombie, this refers to a defunct process, indicating that it is terminated but not by the parent. The information is still available.
What does STAT indicate in the "ps aux" command?
Running slightly differently than the regular “aux” command, “ps ax” has two representations when displayed. The “a” and the “x” signify distinct commands in the ps output.
The “a” command can either direct the ps to display a user-oriented format without the “only yourself” restriction typically implied by BSD-style options. Alternatively, it mandates the ps to list all processes with terminal systems (TTY) or all processes in the “x” option.
The “x” command can either remove the BSD-style “Must have a TTY” restriction, typically imposed on all ps personality settings in the BSD job control format.
In simpler terms, the “a” instructs the ps command to list processes for the primary user and all users on the system. Similarly, the “x” includes processes not running in a terminal, such as a daemon process running elsewhere.
If you prefer a more user-friendly format providing the same information, use the command:
ps axu
Executing this command provides a user-defined format that is more organized and offers an interface with additional information for easier viewing and management.
What does aux mean for WFM?
In the context of Workforce Management (WFM), “aux” typically refers to coding designed to monitor the activity of call center agents and the time they spend on various tasks within the company. In this context, “aux” is also known as Auxiliary Time or Aux Codes. This system allows coders or IT personnel to have file access permissions to view the running processes for each agent, providing insights into their activities and time allocation.
Aux Time Guidelines
In a call center environment, an agent’s extra time is categorized into the following guidelines:
Paid Unproductive Times: Includes activities such as meetings or coaching sessions where the agent is compensated for their time.
Paid Productive Times: Encompasses tasks like handling emails, calls, or other job-related activities for which the agent receives compensation.
Unpaid Time: Encompasses breaks or lunchtime, where the agent is not compensated.
While some may consider combining all of these times for simplicity, it can lead to technical issues. This is because agents might select the wrong aux code, particularly if they have specific metrics associated with certain codes (e.g., after-call work). Such errors could result in aux code misuse and potentially impact overall operational efficiency. Therefore, maintaining clear and distinct categories helps avoid confusion and ensures accurate tracking of agent activities.
Best Practices for Handling AUX Times
Managing AUX times can be straightforward by following basic guidelines:
Measure, Monitor, and Coach: Regularly assess and monitor AUX times, providing coaching and feedback to agents to ensure they adhere to the guidelines.
Aux Code Reports: Utilize reports on AUX codes to track and analyze agent activities accurately.
Watch Agent Morale: Keep an eye on agent morale to understand how AUX times might be impacting their overall job satisfaction and productivity.
Be Aware of AUX Abuse: Stay vigilant for AUX abuse, which involves agents manipulating codes through techniques like aux jumping or aux toggling. This behavior aims to strategically move agents between being ready for a call and AUX time to avoid calls intentionally, potentially leading to financial gains without active work.
Setting clear targets and goals, fostering a positive work environment, and addressing morale issues can contribute to more effective AUX coding. However, it’s important to stay vigilant against potential abuse to maintain a fair and productive call center environment.
What does AUX State signify?
When a user logs into the Automatic Call Distributor (ACD) system, an AUX state is initiated to indicate that agents in a call center are available to take calls. The “STAT” code is commonly employed to represent this state. The status of the active process for the current username is reflected in the virtual files that are displayed, providing a real-time indication of the user’s availability and readiness to handle incoming calls.
Frequently Asked Questions
The `ps aux` command is indeed a powerful tool used by IT and coding professionals to obtain a detailed overview of processes running on a system. Unlike the simple `ps` command, which provides a snapshot of user-specific processes, `ps aux` expands the scope by displaying information about all users, including the root. This command is particularly useful in monitoring and ensuring that agents in a call center are accurately reporting auxiliary time. It provides a comprehensive view of the processes, including their process IDs (PIDs), resource usage, and other relevant details, aiding in efficient system management and troubleshooting.
“Ps aux” and “ps ef” (or -ef) essentially serve the same purpose. Both commands have identical meanings and do not inherently differ. The distinction between “ps -ef” and “ps aux” arises from historical variations between POSIX and BSD systems. At one point, POSIX systems accepted the ps -ef command, while the aux format was exclusively recognized on BSD systems.
The “procs utility” is another useful tool in Linux, serving as an alternative to the ps command. While the ps command provides essential information about processes, the procs utility goes a step further by offering additional options and fields, making it potentially more beneficial in certain situations. Both tools, however, aim to offer insights into the processes running on a system, with the procs utility providing extended capabilities for users who may find its additional features valuable.
You have the ability to terminate a process in Linux using the commands “kill” or “killall.” When using the “kill” command, you terminate a process by its unique Process ID (PID). On the other hand, with “killall,” you terminate processes based on their names.
If you proceed with the “kill -9” command, you are sending a kill signal that forcefully terminates any process running, whether identified by PID or process name. This signal does not allow the process to undergo any cleanup procedures before termination, making it a more aggressive method of stopping a process.
Using “ps aux | grep” enables you to customize the search for a pattern or, in some cases, multiple patterns. For instance, you can filter processes based on certain criteria, such as excluding the session, process group, session leader, and processes not associated with the terminal. The “|” symbol is known as a pipe, and it allows the output of one command to serve as the input for another, facilitating more advanced and specific search capabilities.
While “ps aux” provides the complete command line for each running process, “pgrep” focuses solely on the executable names. This implies that when grepping through the output of “ps aux,” anything occurring in the path or parameters of a “binary” process will be consolidated.