Download and Setting up VNC on Ubuntu 20.04

VNC(virtual network computing), a major breakthrough in remote access, uses an advanced frame buffer protocol to enable reliable communication between clients and servers, ensuring secure data transfer across diverse operating systems and showcasing its flexibility in various remote desktop environments.
VNC stands out as a secure choice for remote communication, prioritizing both privacy and data accuracy, making it the ideal option for those seeking secure remote access.
Jump To...
Selecting the right VNC tool is akin to picking the perfect tool from a toolbox; users can tailor their remote access with options like Xfce, TightVNC, RealVNC, and UltraVNC, leveraging each program’s unique features for enhanced effectiveness and functionality.
To begin the journey, users establish a secure connection through an SSH tunnel, laying the foundation for seamless interaction with the server’s graphical desktop environment.
Integrating TightVNC with the Ubuntu 20.04 server offers numerous benefits. TightVNC operates efficiently, utilizing minimal computer resources, making it an outstanding choice for advanced remote access. Its performance ensures a seamless user experience, especially in slower internet conditions, emphasizing TightVNC as a reliable option for those prioritizing speed and security in remote computing operations.
This article discusses the security features of SSH tunnels and offers practical guidance on configuring TightVNC, providing easy-to-follow instructions suitable for users with varying technical expertise. It transforms an Ubuntu 20.04 server into a powerful TightVNC-enabled system.
After installing the TightVNC server, users can use a local VNC client program to initiate graphical desktop interactions with the Ubuntu 20.04 server.
This seamless interaction between the server and client introduces users to a visually appealing and user-friendly environment, facilitating resource management, file manipulation, program configuration, and setting adjustments.
Despite VNC’s many benefits, users are encouraged to consider potential bandwidth issues. To ensure swift data transmission, the article stresses the importance of finding a balance by opting for greyscale screens and lower screen resolutions.
Prerequisites:
An Ubuntu 20.04 server is set up with a non-root user and a UFW-configured firewall.
Ensure your computer has a VNC client capable of supporting SSH tunnel connections.
On Windows, choose from RealVNC, UltraVNC, or TightVNC. For Mac OS, use RealVNC or the built-in Screen Sharing Program. On Linux, consider Xfce, RealVNC, or TightVNC.
Step 1: Setting Up the VNC Server and Desktop Environment on Your System:
Ubuntu 20.04 servers do not come with a pre-installed VNC server or graphical desktop environment. Follow the instructions in this tutorial to install these essential components.
Opting for the latest TightVNC package and the Xfce desktop environment from the official Ubuntu repository ensures a quick and lightweight setup, ideal for establishing a stable and fluid VNC connection even with slower internet connections.
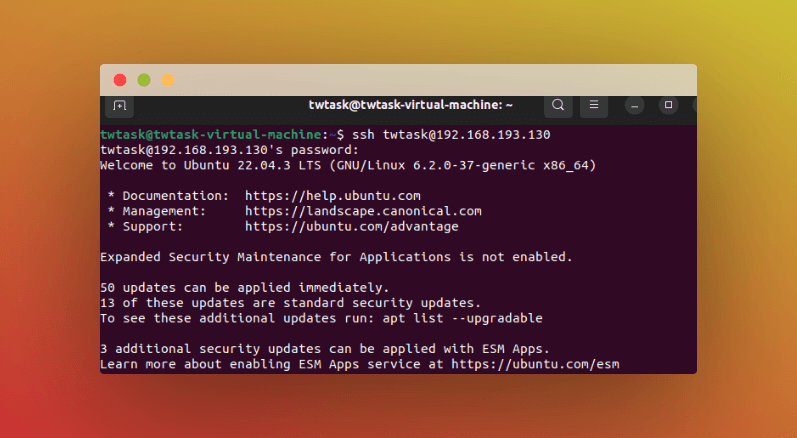
Initiate an SSH connection to your server by executing:
Typically, the command ‘ssh username@serveripORhostname‘ is employed to establish a secure shell connection to a server.
This is an explanation of the command:
SSH: This command line utility facilitates SSH protocol connections to remote servers.
Username: Your username on the remote server.
serveripORhostname: Indicate the server’s IP address or hostname to which you plan to connect.
In my case, the username is twtask, and the server IP is 192.168.193.130.
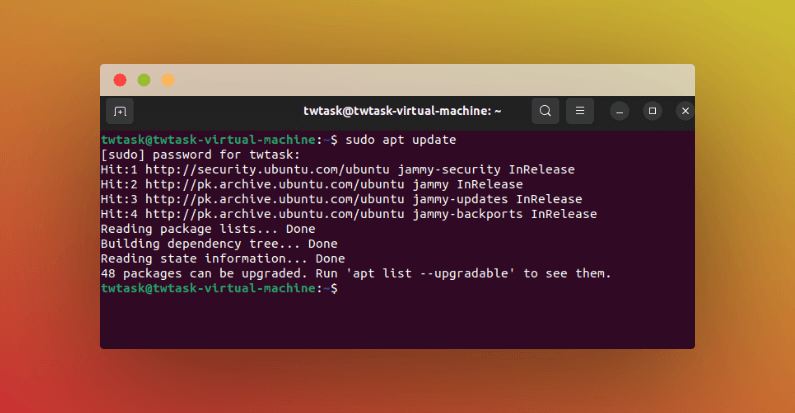
Following that, adhere to the provided instructions to refresh your package list. This smooth installation of the desktop environment and VNC server will boost the performance of your Ubuntu 20.04 server.
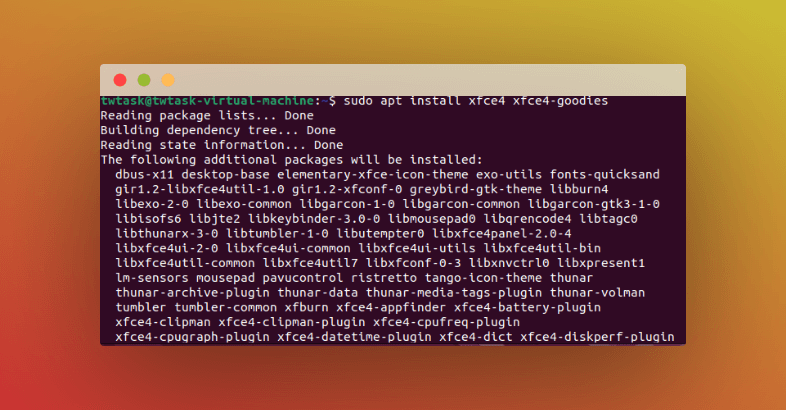
Install Xfce along with the xfce4-goodies package to benefit from additional improvements to the desktop environment.
Once the previous installation is finished, proceed to install the TightVNC server.
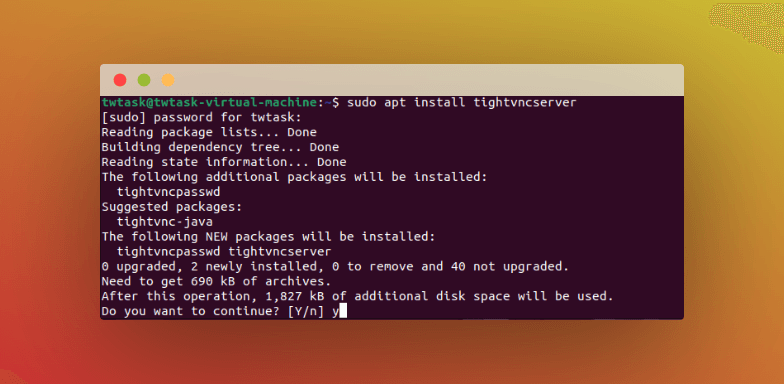
When prompted to proceed, type ‘y‘ and press Enter to continue, as illustrated in the screenshot.
Utilize the ‘vncserver‘ command to initiate the VNC server instance and establish a password for VNC access.

Keep in mind that the password should consist of six to eight characters. If it’s less than six characters, you’ll receive a ‘short password’ alert, and if it exceeds eight characters, it will be truncated.
Allow me to illustrate this for you:

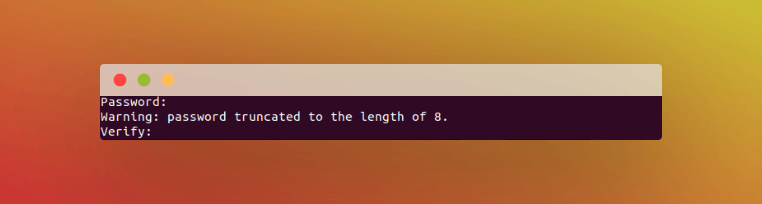
Now, let’s set the password between 6 to 8 characters.

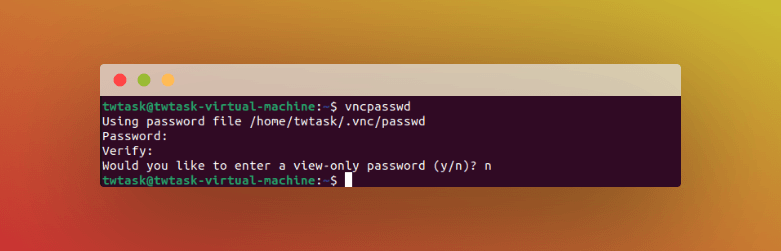
After the password is verified, you can generate a view-only password. Users logging in with a view-only password won’t be able to control the VNC instance using a mouse or keyboard. A view-only password functions like a unique key, granting access to the contents of a remote computer but limiting any further actions.
Note: This process generates the required default configuration files and server connection information while simultaneously initiating a default server instance on port 5901, designated by VNC as a display port and referred to as: 1
Utilize the vncpasswd command to add a view-only password or modify the password after it has been configured.
.
Now, let’s proceed with the configuration to launch Xfce and enable graphical access to the server.
Step 2: Setting Up the VNC Server for the Xfce Desktop Environment:
For optimal performance, the VNC server requires precise starting instructions, particularly when connecting to the graphical desktop environment.
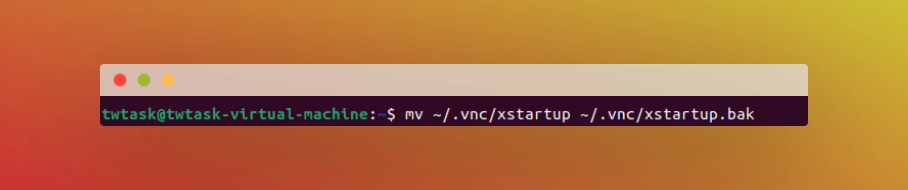
The instructions for actions performed by the VNC server during startup are stored in a configuration file called ‘xstartup,’ located in your .vnc folder within your home directory. While the ‘vncserver’ command creates the default startup script, you can customize your version to launch the default Xfce desktop and environment.
To make changes to the VNC server configuration, first, stop the currently running VNC server instance on port 5901 using the following command:

Before making any modifications, ensure to create a backup copy of the xstartup file
Utilize the text editor nano to create a new xstartup file.

Afterward, add the following lines to the file:
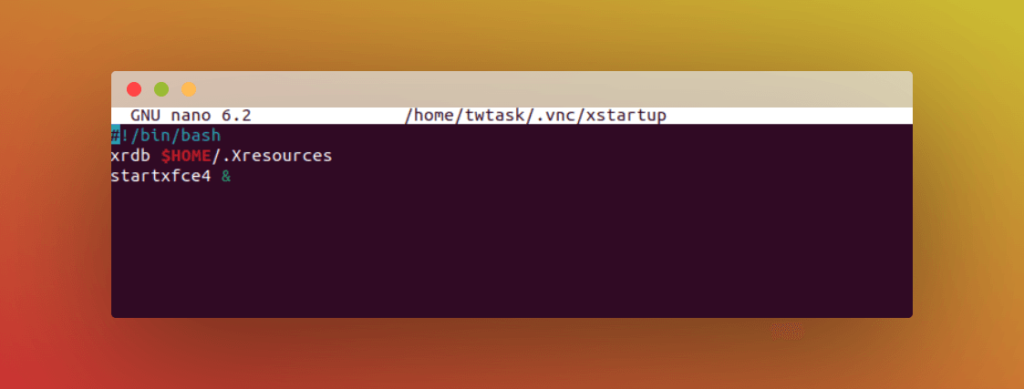
Exactly, on Unix-like systems, the first line of executable plain-text files operates as a shebang, serving as a directive that specifies the interpreter the system should use when executing the file.
The initial command xrdb $HOME/.Xresources in the file instructs the VNC server’s installed GUI framework to read the .Xresources file associated with the server user. Users can modify the font rendering, cursor themes, and terminal colors of the graphical desktop by editing this file. The second instruction ensures that the server launches Xfce. These commands automatically run each time the VNC server starts or stops.
Once you’ve added these lines, save and exit the document.
To ensure the proper functionality of the VNC server with the new startup file, make sure it is executable. Execute chmod +x filename replacing ‘filename’ with the actual name of your startup file.

Following that, restart the VNC server.

Note that this program now incorporates the -localhost option, linking the VNC server to the loopback interface on your server.
The next step is to establish an SSH tunnel between your local computer and the server. This essentially makes VNC think that the connection is originating from the server, enhancing VNC’s security by restricting access to those with SSH access to your server.
Once everything is configured, you can use your local computer to establish a connection with the VNC server.
Step 3: Securing Your VNC Desktop Connection:
When connecting to the server via VNC, secure protocols may not be in place. To enhance security, we’ll establish an SSH tunnel. Instructing the VNC client to utilize this tunnel, instead of attempting a direct connection, ensures a safer connection.
Input the following command into the terminal to establish an SSH connection:
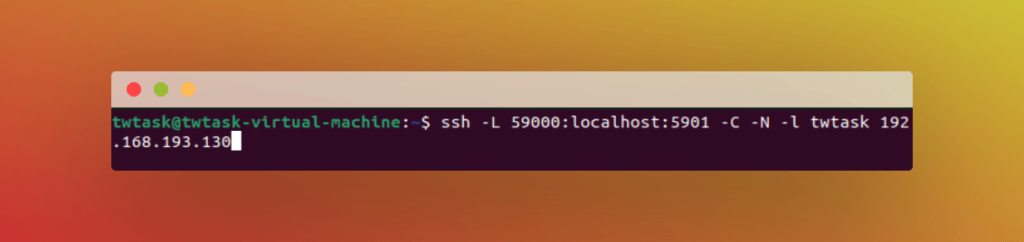
The following describes the options that are utilized in this SSH command:
L 59000:localhost:5901: Indicates that the host and port on the destination server, which is localhost:5901 (i.e., port 5901 on the destination server, identified as 192.168.193.130), should receive traffic from the machine establishing the connection. As long as another service is not using it already, you can use whatever local port you like.
C: This enables compression to enhance performance and utilize fewer resources.
N: This signifies that no remote commands should be executed; it’s useful when only port forwarding is needed.
l twtask: Specifies the user to log in when the connection is established (twtask in this example).
192.168.193.130: Replace this with your server’s real IP address. You can get your IP address by using the command ‘ifconfig.’
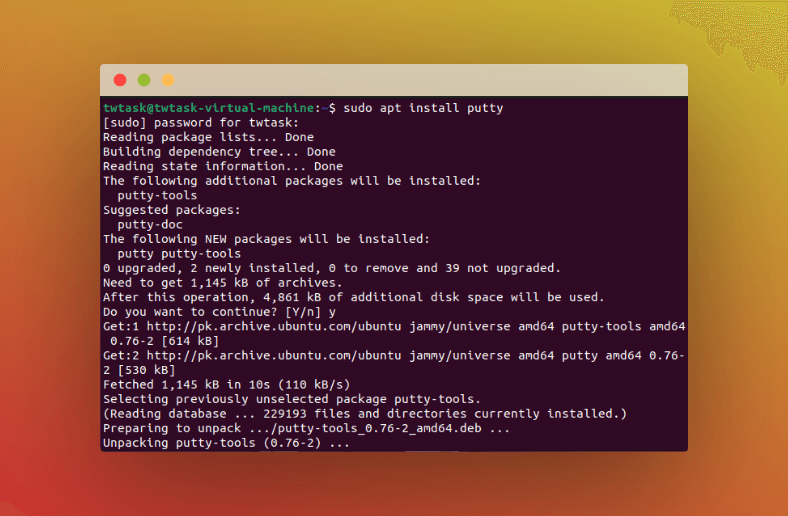
In order to establish a connection with the server, install PuTTY.
Follow the following steps to install:
Step 1: Run the command sudo apt install Putty to install PuTTY.
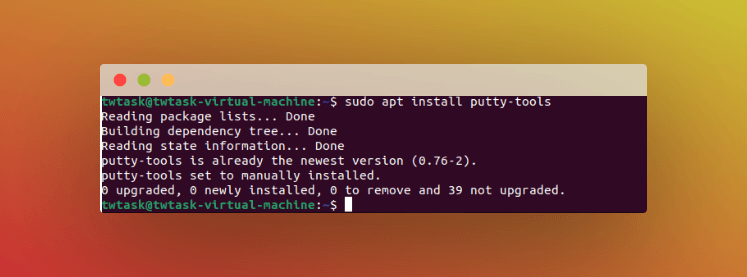
Step 2: Then install tools with this command:
With the installation completed, enter the command “putty” into the terminal to launch PuTTY.

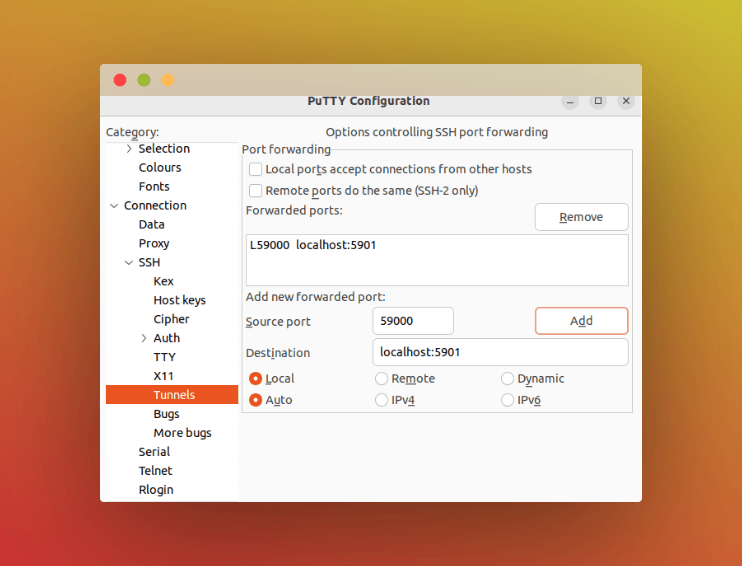
When you navigate to the sessions, enter the port number, the name of the saved session, and your hostname or IP address.

Next, navigate to the Connection section on the left side of the terminal, expand the SSH tunnel and SSH port forwarding screen, and click on “Tunnels.”
To configure SSH port forwarding, input localhost:5901 as the destination and set 59000 as the source port.
Step 4: Configuring a Systemd Service for VNC Server on Ubuntu:
Granting the VNC server the ability to function as a systemd service allows for easy administration.
This entails customizing the server’s start, stop, restart, and shutdown schedules to meet your requirements. Additionally, you can check the server’s status during each boot using system management commands.
To select the preferred VNC display port for service administration, we will initially create a unit file.
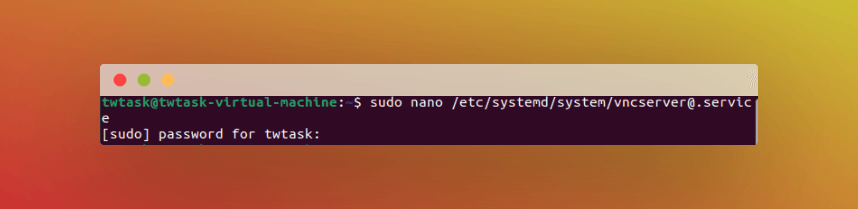
You’ll see the @ symbol at the end of the file name, which indicates that an argument can be included while configuring the service.
Afterward, add the specified lines to the unit file. Customize by changing the WorkingDirectory, User, Group, and username within the PIDFILE value:
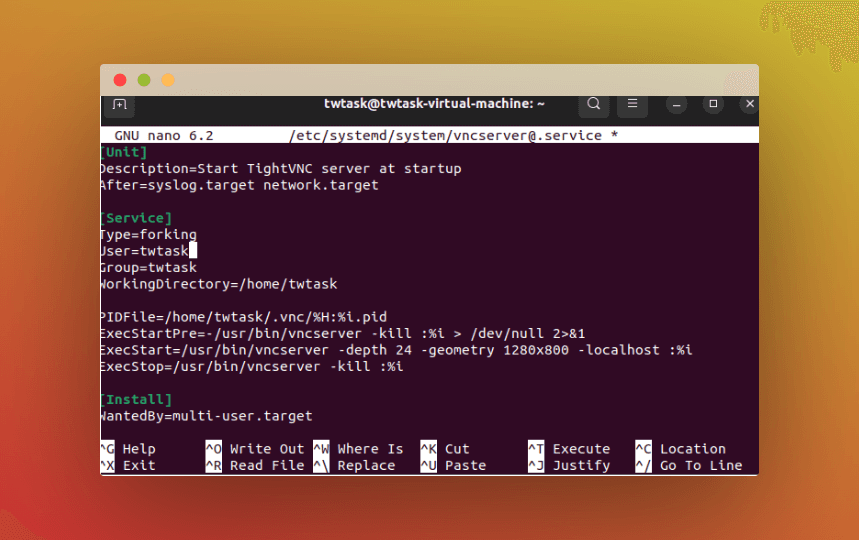
The ExecStartPre command is designed to terminate an open VNC session. Subsequently, VNC is initiated using the ExecStart command, specifying a resolution of 1280×800 pixels and a color depth of 24. These startup parameters can be adjusted according to your preferences. It’s worth noting that the -localhost option is consistently present when using the ExecStart command.
Now, incorporate the newly created unit file into your system by:

Activate the unit file:

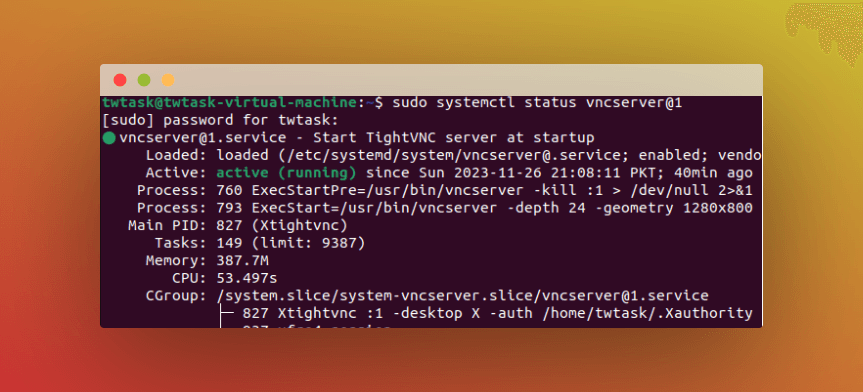
Following the @ symbol, the number “1” indicates the display number where the service will be displayed; in this example, it signifies the default: 1.
If the VNC server is still running, stop its instance:

After that, initiate it as you would any other systemd service:

You can use this command to confirm that it began:
Now that your server is configured to boot up automatically, you can manage your VNC server using systemctl commands, similar to any other systemd service.
However, there won’t be any significant changes from the client’s perspective.
Restarting your SSH tunnel will re-establish the connection.
The Transformative Impact of VNC Servers on Collaborative Computing and Remote Management:
Setting up a VNC server for the first time can be a bit challenging, especially when connecting to a new computer. However, once a stable connection is established, remote computer operation becomes an exciting and enjoyable experience.
Installing a VNC server on your server expands system exploration capabilities and streamlines operations. Enhanced accessibility through an intuitive interface facilitates effective remote operation and adjustments.
It’s important to consider certain factors when using VNC, with excessive bandwidth usage being a notable disadvantage. Strategic solutions like lower screen resolutions and greyscale monitors can help accelerate data transmission by mitigating the impact of bandwidth use.
The versatility of the VNC server extends to its compatibility with a wide range of operating systems, fostering smooth communication between Ubuntu 20.04 servers and other platforms. This interoperability enhances the flexibility of remote computing, encouraging resource sharing and collaboration in various settings.
The process of setting up a VNC server proves to be a valuable tool for navigating the intricacies of remote server management, providing a visual portal to the server’s functions. The user-friendly graphical interface simplifies tasks and setups, benefiting both inexperienced and seasoned users.
In summary, while setting up a VNC server may present initial challenges, the benefits of easier remote management, improved accessibility, and collaborative capabilities make it a valuable addition to your server architecture. By carefully monitoring bandwidth usage and implementing optimization strategies, the VNC server becomes a powerful ally in promoting productive and successful remote computing sessions.