DNS Server Unresponsive [Comprehensive Handbook]

In recent times, several challenges have emerged post updates related to IPv6 and server connectivity. One of these challenges is the well-known “DNS Server Not Responding” error. Our comprehensive guide below provides solutions to address this issue by adjusting your existing DNS settings.
Prior to delving into DNS errors, it’s essential to gain an understanding of the DNS server and decipher the potential implications of this error message.
Jump To...
What Constitutes a DNS Server?
A DNS (Domain Name System) server acts as a bridge linking server IP addresses and website domain names. It furnishes users with the accurate IP address to access a website, eliminating the need to know the site’s direct IP address.
It plays a vital role in establishing connections for various web browsers and online addresses, delivering accurate IP addresses based on the URL. When not functioning correctly, issues often lie on the user’s end, usually rectifiable. The primary task involves identifying the cause triggering the error message.
What does "DNS Server Unresponsive" signify?
When encountering the “DNS server is not responding” error, it can indicate various issues. Potential culprits might include:
- Network Connections
- Web Browsers
- Faulty Modem or Router (Internet Connection)
- Antivirus Software
- Incorrect Server Addresses
- Need for DNS Cache Flush
- IP Version 6 Problems
- Outdated Network Adapter
- Server Outage
Thoroughly addressing each potential problem on your computer is crucial for resolving the “DNS Server Not Responding” issue. Let’s systematically navigate through each step to mitigate possible complications in the future.
Resolving the DNS Server Address Error: What Steps Should I Take?
Fortunately, users encountering the “DNS Server Not Responding” message can rectify the issue independently without reaching out to technical support. This error is usually user-resolvable, and we will guide you through a step-by-step process to successfully address it.
Utilize an Alternate Device
Attempt a connection to the DNS server using an alternative browser or device. Ensure connection to the same network and server being accessed.
If the second device successfully connects to the server on the same network, the issue resides within your primary device. Alternatively, testing with a mobile device can help rule out issues specific to the website.
If none of the devices establish a connection with the server, the problem is not on your end but rather with the site you are trying to access.
Resolve DNS Server Issues by Troubleshooting Network Connections
Windows Instructions
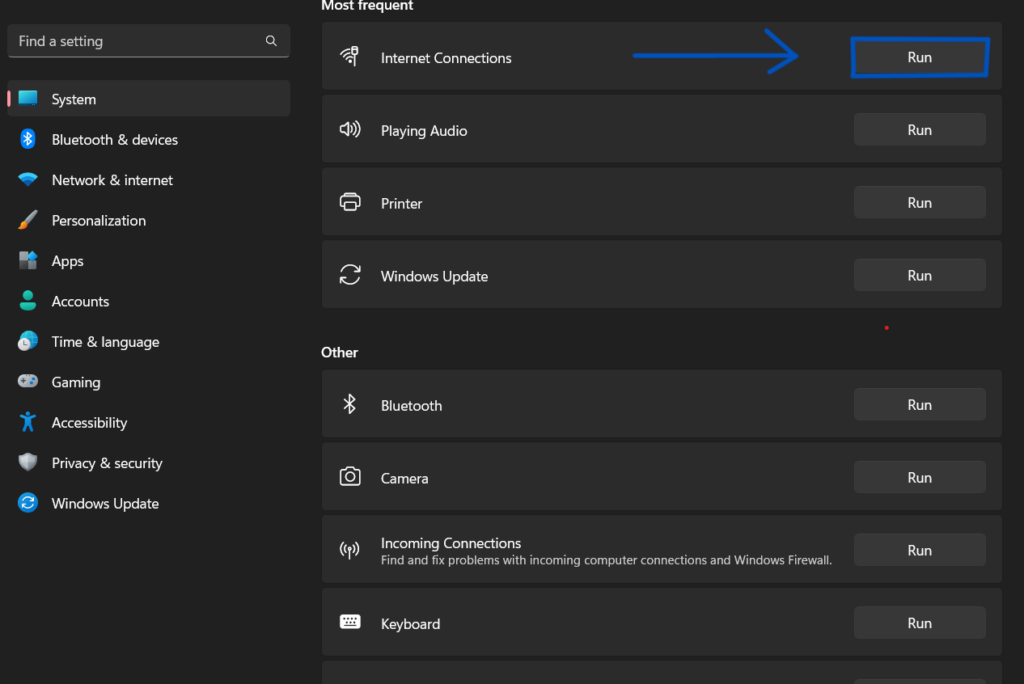
To perform a diagnostic on Windows, follow these instructions:
- Access the Control Panel on your Windows system and go to the Network and Internet section. From there, choose Network and Sharing Center.
- Within the “Change your Network Settings” section, opt for Troubleshoot Problems.
- Navigate to Additional Troubleshooters, select the Network Connections page, and run the Troubleshooter.
- Upon completion of the Troubleshooting process, follow the provided instructions to address any further DNS Server Issues identified.
Mac Instructions
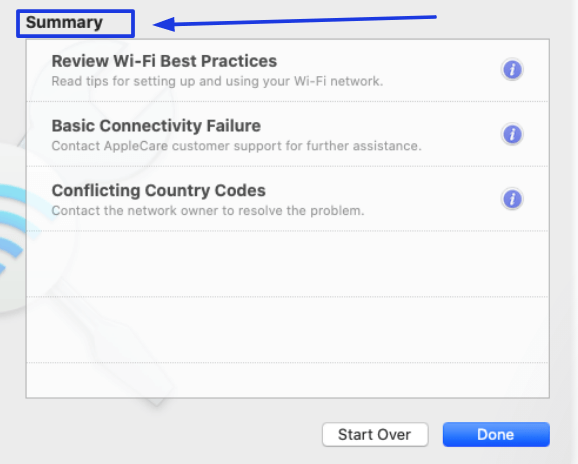
For macOS diagnostic, adhere to these steps:
- Close all currently active applications on your device. Disconnect from the network causing issues.
- Hold down the Options key and select the Wi-Fi Status icon in the menu bar. Opt for Open Wireless Diagnostics.
- Adhere to the on-screen instructions.
- Allow the scanning process to finalize.
- On the Summary page, click on the Information icon.
If the “DNS Server is Not Responding” error message persists, proceed to our following solution.
Change Your Default Browser to Another Web Browser
At times, transitioning between various browsers can resolve DNS address issues. For instance, switching from Microsoft Edge to Google Chrome might be effective. However, specific DNS server problems may arise with other browsers because of insufficient updates or support for your chosen DNS server option.
![DNS Server Unresponsive [Comprehensive Handbook] 4](https://www.blendhosting.com/wp-content/uploads/2024/02/DNS-Server-Unresponsive-Comprehensive-Handbook-4-1024x363.png)
A few alternative well-known browsers you can shift to, which have demonstrated effectiveness in resolving the problem, include:
- Mozilla Firefox
- Google Chrome
- Microsoft Edge
If this resolves your problem, contemplate updating your default browser to its latest version. If the “DNS Server Not Responding” error persists, proceed to the next resolution.
Reconnect/Restart Modem and Router
When your internet router or modem fails to establish a proper connection with your device, it can lead to difficulties in connecting to the DNS Server, rendering the DNS server unavailable.
To initiate a restart of your router or modem, press the power button and disconnect the power cable from the wall outlet. Subsequently, wait for at least 30 seconds (or follow the recommended time provided by your internet service provider) before reconnecting the router or modem to the wall outlet. Then, proceed to press the power button to reboot your device.
It’s advisable to consult your router instructions if the attempt is unsuccessful. Upon successful completion, with a stable internet connection, attempt to reconnect to the preferred DNS servers.
Temporarily Deactivate Antivirus and Firewall Software for a Brief Period
The error of “DNS Server Not Responding” may be associated with your computer’s Antivirus and Firewall Programs. While these programs safeguard against malicious malware, they frequently contribute to the inability to connect to the DNS server. A prevalent antivirus software known for causing this issue is McAfee, renowned for its comprehensive internet protection services.
![DNS Server Unresponsive [Comprehensive Handbook] 5](https://www.blendhosting.com/wp-content/uploads/2024/02/DNS-Server-Unresponsive-Comprehensive-Handbook-5-1024x576.png)
Disabling your Antivirus software briefly can be necessary when dealing with DNS Server Addresses that trigger reactions from the software. Below are simple instructions on how to carry out this process. After disabling the software, verify if the “DNS Server Not Responding” error persists.
Windows Instructions:
Here are the steps to temporarily disable Windows Defender Firewall and Antivirus software:
- Navigate to Start Menu > Settings > Update and Security > Windows Security.
- Access Virus Threat and Protection and Firewall and Network Protection to turn off the software.
Mac Instructions:
To disable Firewall Protection on your Mac, follow these steps:
- Navigate to System Preferences > Security and Privacy.
- Click on the third button from the left labeled “Firewall.”
- Choose “OFF” to disable the Firewall.
After deactivating the firewall, proceed to rerun network diagnostics and revisit the website using your web browser. If this resolves the issue, make sure to update your antivirus and firewall protection software before reactivating.
If the DNS server connection issues persist, proceed to our next potential solution.
Clear DNS Cache
A straightforward solution is to clear the DNS cache, effectively cleansing the router’s cache and ensuring proper operation of the DNS servers.
Windows Command to Clear DNS Cache:
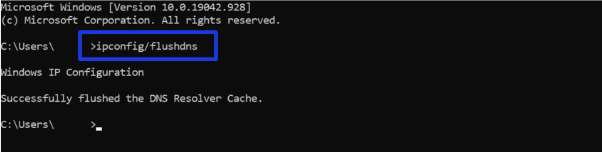
Open the Windows command prompt on your PC by entering “cmd” in the Windows Search.
CMDWithin the command prompt, input:
IPCONFIG/FLUSHDNSand press
<enter>Upon successful execution, you will receive a confirmation in the command prompt.
Commands to Clear DNS Cache on MacOS
Flushing the DNS cache on Mac involves a slightly more intricate process but remains easily accessible.
Press “F4” to enter the terminal.
F4Once the application is open, enter the appropriate command based on your MacOS version:
MacOS Big Sur command prompt:
sudo dscacheutil -flushcache; sudo killall -HUP mDNSResponder
MacOS Catalina:
sudo killall -HUP mDNSResponder
MacOS Mojave:
sudo killall -HUP mDNSResponder
MacOS High Sierra:
sudo killall -HUP mDNSResponder
MacOS El Capitan | X Mavericks | X Mountain Lion | X Lion:
sudo killall -HUP mDNSResponder
MacOS X Yosemite:
sudo discoveryutil udnsflushcaches
MacOS X Snow Leopard:
sudo dscacheutil -flushcache
MacOS X Leopard:
sudo lookupd -flushcache
How can Internet Protocol Version 6 be Disabled for DNS Server Not Responding?
The “DNS Server not Responding” error has recently been linked to Internet Protocol Version 6. Although this serves as a temporary solution, deactivating Internet Protocol Version 6 can help pinpoint challenges you may encounter with DNS servers. Let’s now explore the process of disabling it.
Windows:
To deactivate IPv6 on Windows, follow our outlined steps:
- Right-click on your “active connection” on the Network Connections page.
- Navigate to the Network tab and find “Internet Protocol Version 6 (TCP/IPv6).” Uncheck this box.
- Save changes by clicking “OK.”
Mac:
To deactivate IPv6 on Mac, follow the steps outlined below:
- Navigate to Apple Menu > System Preferences > Network
- Choose the current Network connections and navigate to Advanced > TCP/IP.
- Opt for Configure IPv6 and set it to Off, then click OK.
After disabling Internet Protocol Version 6, reassess the DNS server address to potentially resolve the issue.
How can Internet Protocol Version 6 be Disabled for DNS Server Not Responding?
Updating Network Adapter Drivers is crucial for seamless communication between Network connections and your PC. If these drivers are outdated, it could be a primary cause for encountering the “DNS Server Not Responding” error.
For those new to driver updates, using a user-friendly tool like Driver Easy can simplify the process of automatically updating your Network Adapter Driver software.
If you prefer manual updating, follow the steps below:
1. Search for Device Manager and open the Device Manager app.
2. Navigate to the category for Network Adapter Drivers.
3. Right-click and hold.
4. Select Update Driver.
This procedure should effectively update your Network Adapter Driver. After the update, test the alternate DNS server to check if the responding error persists.
Alter the DNS Server Address
As certain IP addresses might encounter issues connecting to particular DNS servers, consider switching to an alternative. Frequent problems with DNS servers can arise from the ISP’s automated DNS server being unresponsive.
If the ISP’s DNS server fails to respond, it could be inaccurate or non-existent, leading to a halt in the internet connection.
Services such as Cloudflare and Google Public DNS provide free DNS addresses. To configure a new DNS Server address, refer to the instructions below.
Windows Instructions:
Here are the steps to modify the DNS server address on Windows:
Access Network Connections by typing “ncpa.cpl” into the search box and pressing Enter.
ncpa.cpl- Perform a right-click on your existing server and opt for Properties.
- In the subsequent window, navigate to Internet Protocol Version 4 (TCP/IPv4) under Properties.
- Choose “Automatically obtain an IP address” while opting for “Specify DNS server addresses.”
- Input your preferred DNS Server Addresses in the “Preferred DNS Server” and “Alternate DNS Server” fields.
- Before concluding, ensure to verify settings upon exit and click “OK.”
- Reboot the computer.
Mac Instructions:
Here are the steps to modify the DNS server address on a Mac:
Go to Apple Menu > System Preferences > Network
Select your primary network connection > Advanced > DNS.
Select the “+” and add your new desired DNS server address.
Once done, select Apply.
After restarting, make sure to reconnect your internet connection before verifying if the “DNS Server Not Responding” error persists.
Reboot Your Device in Safe Mode
If your computer is encountering issues related to hardware or network failures, which could manifest as “DNS Server not Responding,” initiating a restart in Safe Mode can swiftly address these problems. To carry out this process correctly, follow the provided instructions below.
Windows Instructions:
If you are utilizing a Windows system, follow the instructions below to initiate a restart under Safe Mode:
Go to your Start Menu > Power, then select SHIFT + Restart.
Under the “Choose an Option” window, select Troubleshoot > Advanced Options.
Under Advanced Options, proceed and select Startup Settings > Restart.
Press F5 and proceed to select “Safe Mode with Networking“.
Mac Instructions:
If you are using a Mac, here are the following instructions to Restart your device under Safe Mode:
Go to Apple Menu > Shut Down. Wait for 10 seconds.
When powering your Mac, quickly hold SHIFT until you see the login screen.
If the “DNS Server Not Responding” error vanishes following this process, a potential third-party application is causing interference with the connection between your device and the intended server. Identifying and disabling this application is crucial to eliminating the recurrence of this error on your device.
What DNS Server Should I Utilize?
Below, we’ve presented the top six recommended DNS Server IP addresses available for your use, free of charge.
Google: Widely acknowledged as one of the fastest and best global DNS servers. Utilize either the primary DNS: <8.8.8.8> or the secondary DNS: <8.8.4.4>.
OpenDNSHome: Known for its excellence in both personal and enterprise-level web access/control. Primary DNS: <208.67.222.222>, Secondary DNS: <208.67.220.220>.
Cloudflare: Highly recommended for its speed and reliability, particularly suitable for family use. Primary DNS: <1.1.1.1>, Secondary DNS: <1.0.0.1>.
AlternateDNS: Ensures a safe and dependable server experience. Primary DNS: <76.76.19.19>, Secondary DNS: <76.223.122.150>.
AdGuard DNS: Offers less intrusive servers for a family-safe and speedy connection. Primary DNS: <94.140.14.14>, Secondary DNS: <94.140.15.15>.
Quad9: Ideal for mobile, desktop, and IoT devices. Primary DNS: <9.9.9.9>, Secondary DNS: <149.112.112.112>.
If you’ve explored all potential solutions and find that the browser operates on all devices except one, consider opting for an alternative server or waiting to retry, as occasional server outages may be the cause of the “DNS Server Not Responding” issue.
Frequently Asked Questions
From DNS configurations to improper IP address connections, an error in DNS server responsiveness could result from various network issues. Primarily, however, it indicates a disrupted network connection.
The majority of DNS server failures stem from an unstable internet connection. To resolve the “DNS Server Not Responding” error, try disconnecting and then reconnecting your internet. If the DNS server issues persist, it is advisable to reach out to your service provider for potential solutions.
Open your command prompt and enter “nslookup” followed by the domain name, operating system, or IP address you wish to track. Upon hitting enter, the command will furnish Name Service details or information pertaining to the specified IP address.
When considering a shift in DNS servers, what takes precedence are factors like dependability, security, speed, accessibility, and cost-effectiveness. Additionally, it’s crucial to evaluate the global traffic management capabilities of the involved company. DNS servers that excel in global connectivity leverage optimized load management strategies.
Efficient load management plays a pivotal role in ensuring the company maintains a balanced approach for maximum uptime.
To identify your DNS in Windows, follow these steps:
Press the Win+R key, then enter “CMD.”
Type <ipconfig/all> and examine the address field next to the servers.
For MacOS:
Open System Preferences > Show All > Network.
Navigate to the Advanced tab, then click on DNS.
You can also check the DNS on your mobile device. Access the Wi-Fi icon, select the available network, and obtain details, including the DNS address.
Why Should I Use Different DNS Servers?
Employing an alternate DNS can lead to expedited internet access, culminating in an enhanced internet connection quality. It is advisable based on the website safeguards your DNS delivers against DNS-related threats, including DNS Hijacking, Cache Poisoning, and DDoS attacks.
The primary categories of DNS servers generally consist of servers offering both a primary and a secondary server address.
The primary server serves as the favored server with enhanced functionality, while the secondary server serves as an alternative to the primary server. A DNS setup with dual servers adds an additional layer of redundancy, optimizing overall uptime.
Certainly, initiating a reset of your device’s DNS is safe. This process allows the clearing of potential errors and eliminates manipulated or outdated invalid addresses from your connection.
Flushing the cache has no adverse effects on your device and yields a more favorable response than other alternatives.
DNS Hijacking has consistently been prevalent for years. Cybercriminals recognize that DNS is a reliable protocol extensively employed by major organizations. Once hijacked, it enables easy access to all information, inaccessible to the average web user. If left undetected, it poses a significant threat to user identities and sensitive information.
While certain Internet Service Providers (ISPs) may find it convenient to forego DNS encryption for customer information, it poses a potential risk following a successful hijack.