Capture Your Screen: Step-by-Step Guide for Screenshots in Windows 11

Capturing screenshots is a convenient method for preserving and sharing information displayed on your computer screen. Whether you wish to save a humorous meme, record a significant error message, or share a specific section of your screen with others, the ability to take screenshots is invaluable.
One of the most frequently asked questions pertains to the process of taking screenshots on Windows 11. In this guide, we will walk you through the steps for capturing screenshots in Windows 11, the newest operating system developed by Microsoft.
Jump To...
Method 1
Utilizing Keyboard Shortcuts Windows 11 offers numerous keyboard shortcuts to swiftly capture screenshots. Let’s delve into the various alternatives:
Full-Screen Capture:
1. Screenshot Key
- Press the “PrtScn” or “Print Screen” key on your keyboard.
- The screenshot will be automatically saved to the Screenshots folder within your Pictures directory.
2. Capture of Active Window
- Press “Alt + PrtScn” simultaneously to capture only the active window.
- The screenshot will likewise be stored in the Screenshots folder.
Method 2
Utilizing the Snipping Tool. Windows 11 continues to provide the classic Snipping Tool, which presents more advanced screenshot functionalities. Here’s how to utilize it:
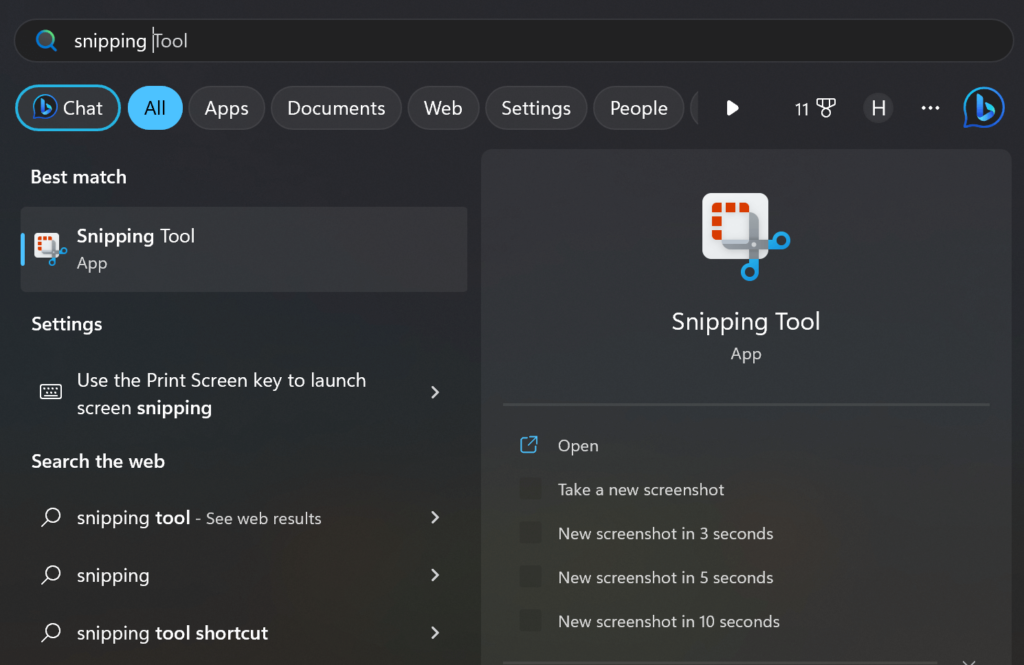
- Access the Snipping Tool:
- Initiate by clicking on the Start button and searching for “Snipping Tool.”
- Launch the Snipping Tool application.
2. Capture the Desired Area:
- Within the Snipping Tool window, select “New.”
- Choose the area you wish to capture by dragging the cursor around it.
- Release the mouse button to capture the selected area.
3. Save or Share the Screenshot:
- After capturing the screenshot, if necessary, you can annotate it.
- Click on “File” and select options such as “Save As” or “Copy” to save or share the screenshot.
Method 3
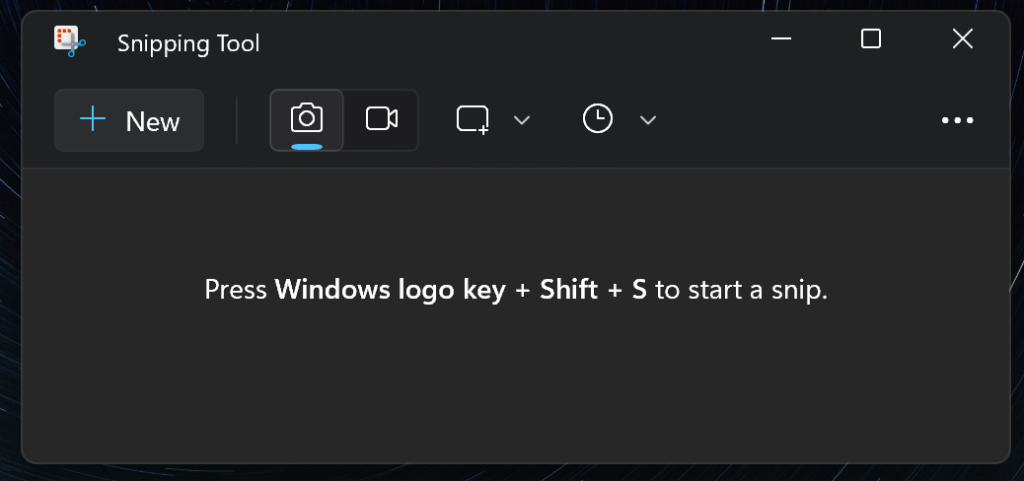
Using the Windows + Shift + S Shortcut, Windows 11 introduced a new built-in screenshot tool called “Snip & Sketch,” enabling you to capture screenshots and perform basic edits. Here’s how to utilize it:
1. Activate Snip & Sketch:
- Press the Windows key + Shift + S on your keyboard.
- The screen will dim, and a toolbar will emerge at the top of the screen.
2. Capture the Desired Area:
- Choose the type of screenshot you wish to take from the toolbar (rectangular, freeform, window, or fullscreen).
- Capture the desired area by clicking and dragging the cursor.
3. Annotate and Save:
- Upon capturing the screenshot, you can annotate it using the provided tools.
- Click the “Copy” or “Save” button in the Snip & Sketch toolbar to save or copy the screenshot to the clipboard.
Method 4
Utilizing the Game Bar: If you’re an enthusiastic gamer or wish to capture screenshots from games or other applications, Windows 11’s built-in Game Bar can prove invaluable:
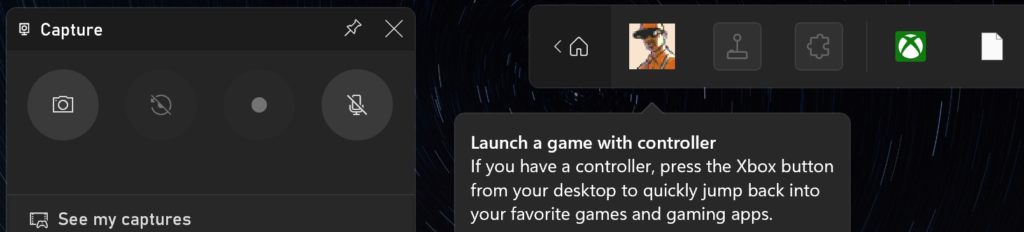
1. Access the Game Bar:
- While in a game or application, press “Win + G” to open the Game Bar.
- If prompted, confirm that it is a game or application you intend to capture.
2. Capture the Screenshot:
- Click on the camera icon within the Game Bar menu to capture a screenshot.
- The screenshot will be automatically saved to the Captures folder in your Videos directory.
Taking Screenshots with Windows 11's Improved Snip & Sketch Tool
Windows 11 introduces an upgraded iteration of the Snip & Sketch tool, elevating its versatility in capturing and editing screenshots. Following the capture of a screenshot, the Snip & Sketch tool unveils a floating window, enabling you to crop, annotate, draw, and incorporate text into your screenshot.
The enhanced image editing program and its features empower you to emphasize crucial information, blur sensitive data, and leverage a digital pen for precise annotations. Upon completing the edits to your satisfaction, you can save or share the screenshot directly from the Snip & Sketch tool.
Leveraging Clipboard History for Screenshots
Windows 11’s Clipboard History feature proves invaluable when capturing multiple screenshots or copying and pasting content. Simply press “Win + V” on your keyboard to access the Clipboard History, where your recent screenshots and copied items are displayed.
This functionality enables you to effortlessly select and paste any previously captured screenshots, eliminating the hassle of manually locating and opening saved image files. It offers a convenient method to manage and reuse screenshots without cluttering your desktop or folders.
Capturing Specific Portions with Snip Outline
Windows 11 introduces a novel feature known as Snip Outline, facilitating rapid screenshots of specific screen sections. By pressing “Win + Shift + S” and opting for the Snip Outline option, a resizable and movable snipping frame materializes on your screen.
You can effortlessly drag and adjust the frame to encapsulate the desired area, then release the mouse button to capture the screenshot. This functionality proves particularly advantageous when capturing irregularly shaped or specific portions of application windows or websites.
Setting up Automatic Saving of Screenshots to a Custom Location

Windows 11 offers flexibility in customizing where your screenshots are automatically saved. To modify the default location, follow these steps:
1. Open the Settings app by clicking the Start button and selecting the gear-shaped icon.
2. Navigate to the System section and click “Storage” in the left sidebar.
3. Scroll down to the “Save locations” section and click on “Change where new content is saved.”
4. Under the “Screenshots” section, click the dropdown menu and select your preferred storage location, such as a specific folder or an external drive.
5. Windows 11 will automatically save screenshots to the chosen location, ensuring easy access and organization.
Sharing Screenshots using Windows 11's Share Feature
Windows 11 streamlines the process of sharing screenshots with its integrated Share functionality. After capturing a screenshot using any of the aforementioned methods, you can swiftly share it with others through various communication apps or social media platforms.
Click on the Share button, denoted by an icon with three interconnected dots, and a sharing panel will emerge on the right side of the screen. From there, you can select the desired app or platform, include a message if necessary, and promptly share the screenshot with friends, colleagues, or your social media followers.
Taking Screenshots using Third-Party Applications
While Windows 11 offers several built-in methods for capturing screenshots, you might consider exploring third-party applications for more advanced features.
Numerous third-party tools provide additional functionalities like capturing scrolling webpages, recording screen activity, adding watermarks, or applying advanced editing effects. These applications can enhance your screenshotting experience and cater to specific needs beyond the capabilities of native Windows tools.
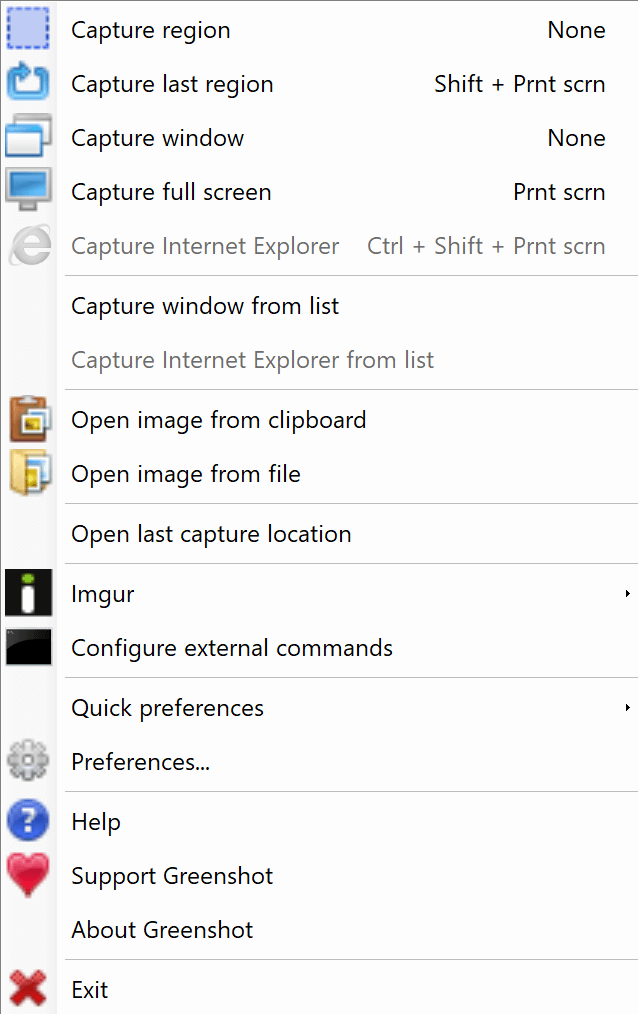
Popular choices include Snagit, Greenshot, Lightshot, and ShareX. These tools offer diverse screenshot features and can be downloaded and installed from their official websites to fulfill various screenshotting needs.
Utilizing Windows 11's Screenshot Configuration
Windows 11 incorporates dedicated screenshot settings, enabling you to personalize and refine your experience. To access these settings, follow these steps:
1. Open the Settings app by clicking the Start button and selecting the gear-shaped icon.
2. Navigate to the System section and click on “Display” in the left sidebar.
3. Scroll down to the “Capture” section, where you’ll encounter options such as “Copy to clipboard” and “Notification on the screenshot.”
4. Toggle these settings on or off based on your preferences. For instance, enabling the “Copy to clipboard” option allows you to swiftly paste screenshots into other applications without saving them as files. Adjust these settings to suit your screenshotting workflow.
Committing Keyboard Shortcuts to Memory for Efficient Screenshotting
Becoming proficient in taking screenshots in Windows 11 entails remembering the keyboard shortcuts mentioned earlier. These shortcuts offer a swift and efficient method to capture screenshots without the need to navigate menus or search for specific tools.
Through practice and familiarization with these shortcuts, you can streamline your workflow and seamlessly capture screenshots whenever necessary. This mastery enhances your productivity and ensures you can capture and share information swiftly.
About Us
BlendHosting.com stands as a premier provider of dependable and high-performance virtual private servers (VPS). Our offerings are backed by cutting-edge technology, resilient infrastructure, and unparalleled customer support. We are dedicated to empowering both businesses and individuals to thrive in the digital realm through scalable solutions, affordability, and an unwavering dedication to excellence. Opt for BlendHosting.com for reliable VPS hosting and unleash the complete potential of your online presence.
Frequently Asked Questions
In Windows 11, capturing a specific portion of the screen can be achieved using the Snip & Sketch tool. Simply press “Win + Shift + S” to activate the snipping tool app, prompting a snipping frame to appear on the screen. From there, drag and adjust the fullscreen snip frame to capture the desired area accurately.
By default, in Windows 11, when you capture a screenshot, it is saved to the Screenshots folder within the Pictures directory. This offers a convenient location for locating and organizing your captured screenshots. However, if you wish to save them to a different location, you can customize the save location by adjusting the settings in the Storage section of the Windows 11 Settings app.
Indeed, capturing a screenshot of a specific window in Windows 11 is straightforward. Simply press the “Alt + PrtScn” keyboard shortcut simultaneously, and it will capture a screenshot of the currently active window. This convenient shortcut streamlines the process, allowing you to capture precisely what you need with ease.
To capture a full-screen screenshot in Windows 11, you can use the traditional “PrtScn” or “Print Screen” key on your keyboard. Pressing this key captures the entire screen and saves it as a screenshot. Afterwards, you can access the fullscreen screenshot from the Screenshots folder within the Pictures directory.
Exactly! Windows 11 offers various keyboard shortcuts for swiftly and conveniently capturing screenshots. For instance, you can press the “PrtScn” or “Print Screen” key to capture a full-screen screenshot. If you only want to capture the active window, the “Alt + PrtScn” keyboard shortcut is the way to go. Moreover, the “Win + Shift + S” shortcut activates the Snip & Sketch tool, enabling you to capture specific areas or windows on your screen. These shortcuts make the process efficient and hassle-free.
Windows 11 provides built-in tools that enable you to annotate and edit screenshots seamlessly. When you capture a screenshot using the Snip & Sketch tool, Snipping Tool, or Game Bar, the screenshot automatically opens in an editing window. Here, you can add text, draw shapes, highlight areas, and crop the image as needed. These editing tools offer basic functionality for enhancing and customizing screenshots without requiring additional software, making it convenient to tailor your screenshots to your preferences.
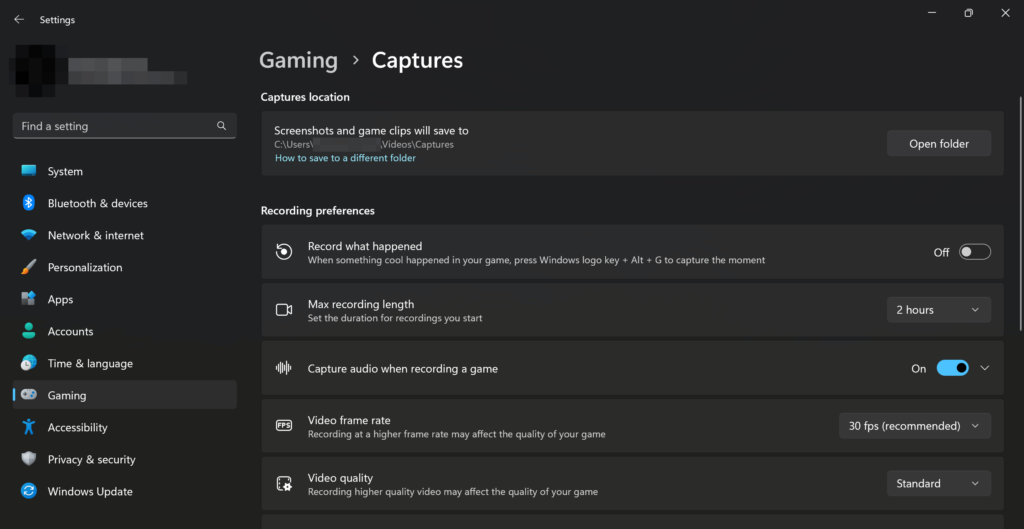
Indeed, Windows 11’s Game Bar is tailored to enable you to capture screenshots of the entire screen while gaming or using other applications. While in a game or app, simply press “Win + G” to open the Game Bar overlay. From there, click on the camera icon to capture a screenshot of the current screen. By default, the captured screenshot will be saved to the Captures folder within the Videos directory. This functionality makes it convenient to capture memorable moments or share gameplay highlights effortlessly.
Windows 11 streamlines the process of sharing screenshots through its integrated Share functionality. Once you’ve captured a screenshot, simply click the Share button, depicted by an icon with three interconnected dots.
This action will prompt a sharing panel to appear on the right side of the screen, presenting a variety of apps and platforms through which you can share the screenshot. You can select the desired app or platform, add a message if necessary, and promptly share the screenshot with friends, colleagues, or your social media followers. This feature enhances convenience and efficiency when sharing your screenshots with others.
While Windows 11 offers robust built-in tools for capturing screenshots, third-party applications provide additional features and functionalities. Some popular third-party screenshot tools for Windows 11 include Snagit, Greenshot, Lightshot, and ShareX. You can download and install these third-party apps from their respective websites to explore their full capabilities. These tools often offer advanced editing options, annotation features, and more, allowing you to tailor your screenshot-taking experience to your specific needs and preferences.
Windows 11 enables you to customize various screenshot settings to suit your preferences. To access these settings, open the Settings app by clicking the Start button and selecting the gear-shaped icon. Then, navigate to the System section and click on “Display” in the left sidebar. Scroll down to the “Capture” section, where you’ll encounter options such as “Copy to clipboard” and “Notification on the screenshot.” You can toggle these settings on or off according to your preferences. For instance, enabling the “Copy to clipboard” option facilitates quick pasting of screenshots into other applications without saving them as files. Adjust these settings to enhance your screenshotting experience and streamline your workflow.