
How to configure WireGuard on your Ubuntu 20.04 server
What is WireGuard?
WireGuard is a straightforward, fast, and contemporary VPN employing cutting-edge cryptography. It aspires to be quicker, more straightforward, and more practical than IPsec. This tutorial can serve as a reference to assist you in installing and configuring your WireGuard server and client.
Step 1: Installing WireGuard
$ sudo apt update
$ sudo apt install wireguard
Step 2: Generating the private key
$ wg genkey | sudo tee /etc/wireguard/private.key
Generating the public key
$ sudo cat /etc/wireguard/private.key | wg pubkey | sudo tee /etc/wireguard/public.key
Step 3: Choosing IPv4 and (or) IPv6 Addresses
You will need to choose a IP range. In this example we will be using the 192.168.0.0 – 192.168.255.255 range.
Step 4:
Generate the WireGuard Server Configuration File
Access the designated file using your preferred text editor. In this instance, we will utilize nano.
$ sudo nano /etc/wireguard/wg0.conf
Write the following.
[Interface]
PrivateKey = serves_generated_private_key
Address = 192.168.1.1/24
ListenPort = 51820
SaveConfig = true
Save the file.
Step 5: Modifying the server network configuration. To set up forwarding, insert a line into the /etc/sysctl.conf file.
$ sudo nano /etc/sysctl.conf
Add the following to the bottom of the file.
net.ipv4.ip_forward=1
If you are using IPv6 you can add the following to the bottom of the file.
net.ipv6.conf.all.forwarding=1
To read and load the new values of your current terminal session run the following command.
$ sudo sysctl -p
Output:
net.ipv4.ip.forward = 1
or
net.ipv6.conf.all.forwarding = 1
Depending on your choice of configuration.
Step 6: Configuring the servers firewall.
Identify the public network interface of the server by executing the following command.
$ ip route list default
Output
default via XXX.XXX.XXX.XXX dev eth0 onlink
Where eth0 is the interface of our public network
Include this interface in the IP table rule.
Access the configuration file.
$ sudo nano /etc/wireguard/wg0.conf
At the bottom of the file. Add the following:
PostUp = ufw route allow in on wg0 out on eth0
PostUp = iptables -t nat -I POSTROUTING -o eth0 -j MASQUERADE
PostUp = ip6tables -t nat -I POSTROUTING -o eth0 -j MASQUERADE
PreDown = ufw route delete allow in on wg0 out on eth0
PreDown = iptables -t nat -D POSTROUTING -o eth0 -j MASQUERADE
PreDown = ip6tables -t nat -D POSTROUTING -o eth0 -j MASQUERADE
Based on your IP preferences, you can eliminate either the IPv4 or IPv6 rule.
The PostUp rules will execute when the server initiates the virtual VPN tunnel, while the PostDown rules will run when the server halts the virtual VPN tunnel.
The final step in the firewall configuration is to permit traffic to and from the WireGuard UPD port. The designated port to open is 51820. If you’ve opted for a different port, ensure to use it in the following command.
$ sudo ufw allow 51280/udp
Upon adding the rules, it’s necessary to deactivate and reactivate UFW. This allows the system to implement all the modifications we’ve applied.
$ sudo ufw disable
$ sudo ufw enable
Verify the accurate application of all rules by executing the following command.
$ sudo ufw status
Output
To Action From
-- ------ ----
51820/udp ALLOW Anywhere
OpenSSH ALLOW Anywhere
51820/udp (v6) ALLOW Anywhere (v6)
OpenSSH (v6) ALLOW Anywhere (v6)
Step 7:Initiating the WireGuard Server.
Enable the WireGuard service to launch automatically at boot.
$ sudo systemctl enable wg-quick@wg0.service
Lets start the service.
$ sudo systemctl start wg-quick@wg0.service
Make sure that the service is active an running. You can check this by running the following command.
$ sudo systemctl status wg-quick@wg0.service
Step 8:Setting up the WireGuard Client on MacOS and Windows 10. In this instance, we’ll focus on the Mac OS client.
For MacOS, obtain the application from the App Store by searching for WireGuard. Once downloaded, launch the application.
In the top left corner of your screen, locate a + sign. Click on it and select the Add Empty Tunnel option.
![configure wireguard on ubuntu[add empty tunnel]](https://www.blendhosting.com/wp-content/uploads/2024/01/configure-wireguard-on-ubuntuadd-empty-tunnel.png)
You will see that it has generated a public and a private key for your client system. However, we still need to add some rules to the file. Add the following lines to your file.
[Interface]
PrivateKey = YOUR_CLIENTS_PRIVATE_KEY
Address = 192.168.1.10/24
DNS = 8.8.8.8, 8.8.4.4

[Peer]
PublicKey = YOUR_SERVERS_PUBLIC_KEY
AllowedIPs = 0.0.0.0/0
Endpoint = YOUR_SERVERS_WAN_IP:51820
It should looke something like this.
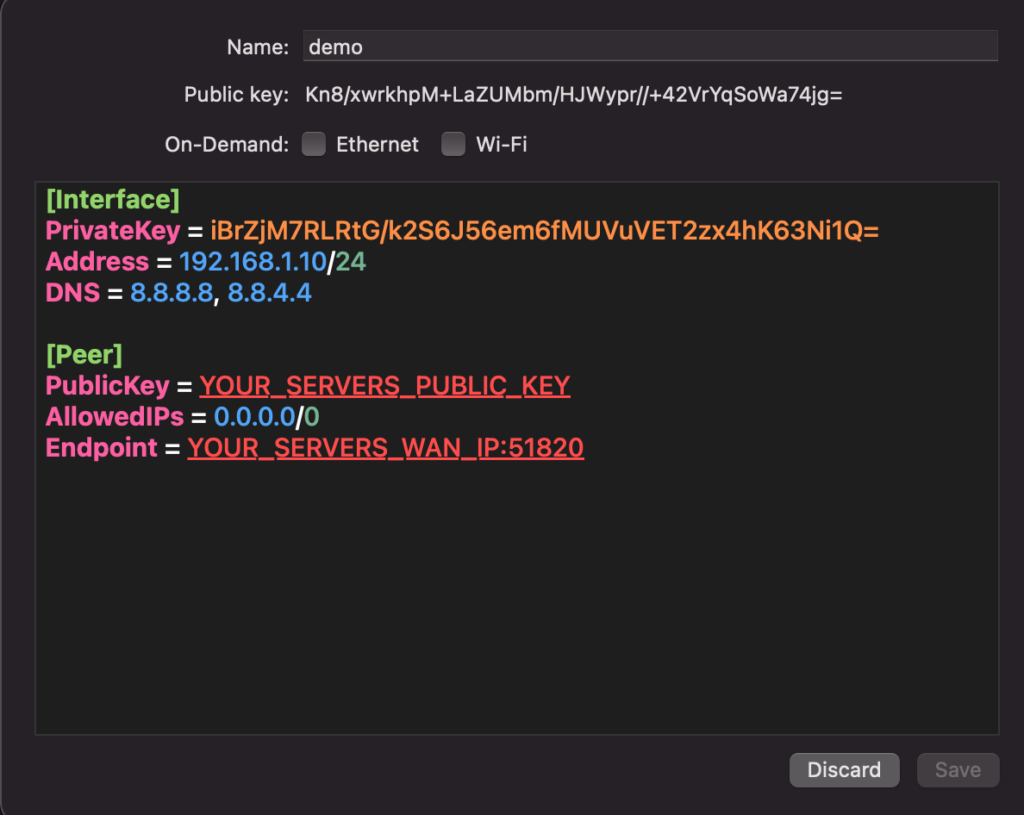
Give the file a name and click save. You might get a message saying “WireGuard” Would like to Add VPN Configurations Make sure to press Allow.
![configure wireguard on ubuntu[VPN conf]](https://www.blendhosting.com/wp-content/uploads/2024/01/configure-wireguard-on-ubuntuVPN-conf.png)
Now back to the server. Run the following command to let the server now who the client is.
$ sudo wg set wg0 peer YOUR_CLIENTS_PUBLIC_KEY allowed-ips 192.168.1.10
Now activate the tunnel on your client device and test the connection. You can test the connection by pinging from your server to your client and back.