Setting Up Node.js on Ubuntu 18.04 and Deploying an Express SSR Website
If you find yourself here, chances are you have a website, web app, or a personal project developed using Node.js and Express. You’ve successfully run it on your localhost, and now you’re at Blend Hosting [1] to take it live on the web. Congratulations! Our flexible pricing plans [2] start from just $9.59/mo, making it an excellent choice for projects of various sizes.
As you proceed to purchase and configure your server, keep in mind that this tutorial focuses on Node.js under Ubuntu. It assumes you’ve chosen “Ubuntu” as the operating system for your server. While I’m not a Linux expert, this guide covers the essential steps. Let’s get started.
- Server Setup:
- Purchase a server with the desired configuration.
- Configure the server, and note the provided IP address, your username, and SSH password.
- Node.js Installation:
- Open your terminal (use PuTTy or Git Bash on Windows) and log in via SSH:
ssh username@XXX.XXX.XXX.XXX
Replace XXX.XXX.XXX.XXX with your server’s IP address.
- Open your terminal (use PuTTy or Git Bash on Windows) and log in via SSH:
- Installing Node.js and npm:
- The server comes with a basic Ubuntu distribution. Install Node.js and npm:
sudo apt update

sudo apt install nodejs

sudo apt install npm
- The server comes with a basic Ubuntu distribution. Install Node.js and npm:
- Verifying Installation:
- Check Node.js and npm versions to ensure successful installation:
node -v

npm -v
- Check Node.js and npm versions to ensure successful installation:
Note for Windows Users: For PuTTy or Git Bash on Windows, remember to use [Shift + Ins] instead of [Ctrl + V] to paste your password from the clipboard during login. Just a heads up!
After logging in, proceed to install Node.js, npm, and the “unzip” tool, which is necessary for extracting archives on the server. Use the following terminal commands:
apt install nodejs
apt install npm
apt install unzip
Now that you have all the essential tools, it’s time to deliver your project to the server. Create a ZIP archive of your project (exclude the “node_modules” folder and “package-lock.json” lockfile), and open another terminal from your local project directory. Use the “scp” command:
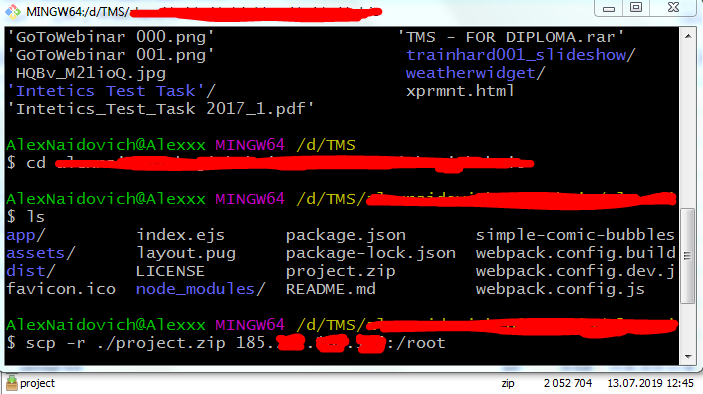
After successful copying, the archive should be present in the root directory of your server. Verify its presence using the “ls” command in the terminal. Now, proceed to unpack your project, install its dependencies, and run it with the following terminal commands:
unzip .zip
npm install
After successfully unpacking your project and installing its dependencies, you are ready to run it. However, it’s crucial to note that we haven’t executed it yet. To do so, you can utilize the default Linux method to run processes in the background. The command structure is as follows:
nohup npm start &
The previous method for running your Node.js app has limitations, especially regarding automatic restarts in case of unexpected shutdowns. To address this, it’s recommended to use the “pm2” npm package. This tool not only restarts your app after an unhandled exception but also offers comprehensive documentation for managing your processes.
To use pm2, follow these steps in your server’s terminal:
npm install -g pm2
pm2 .js
Congratulations! Your Node.js app is now up and running on your VPS. To access it from your browser, enter your server’s IP address without adding a port number, assuming your app listens on the default port (80).
If you wish to connect your app to a domain name, you can follow a dedicated tutorial[4] on this subject.
I hope this tutorial has streamlined your deployment process and saved you from extensive Stack Overflow searches. Feel free to comment if you have additional insights or if any corrections are needed.
[1]: https://www.blendhosting.com/
[2]: https://www.blendhosting.com/vps/windows/
[3]: https://www.npmjs.com/package/pm2
[4]: https://www.blendhosting.com/kb/hostnames-and-dns-in-blend-hosting/